PROPOSAL PAGE
BREIF OUTLINE
This section of my page will outline exactly what the FMP is looking for and how I will attempt to meet the brief. I will have to make use of everything I have learnt up to this point. From fundamental methods in Maya and Blender, to problem solving and feedback methods. A huge range of hard and soft skills will be needed - all developed throughout the last 2 years. I will create an art piece, showcasing my skills and present it to an audience. We have no theme to fit around, very few requirements of what to make. Just some criteria in the process of how to make it. I will have to act professional, manage my timings to meet deadlines and making full use of the resources available. This will be documented and logged within these website pages in the form of written and videoed evidence - a diary of my progression. Any changes, issues and how I fixed them will be documented alongside my overall progress. With this much freedom, it will be up to me to manage and set my own goals.
TASK 1, the proposal, will grant me the opportunity to explore several ideas in shallow depth. The Proposal is built to help me explain my final idea, as well as how it developed and progressed from first thoughts. Out of the 7 criteria points, my supervising teacher is looking for criteria 1 and 2 especially. This project is near-completely independent. The teacher is only there to act as a guide, with the goal to allow students to be self-sufficient.
Criteria Points to Hit: IN MY OWN UNDERSTANDING
1.1 - Create a rational and Proposal of idea, with clear and precise reasons to why. Give context to why you are doing this idea in the first place.
1.2 - Break down the idea and use evaluation to discuss strenghs and weaknesses. Use this to develope the idea further into something greater.
2.1 - Back up this development of ideas using research, the greater the variety the better. Academic research is a must due to it's high validity. Link it to the industry, workflow processes, perspectives that impact said area...
2.2 - Use evaluation and break down issues relating to your project. Analysis the issue to create solutions and problem solve. In the context of the proposal, eliminate potential ideas and narrow down on the idea to develop further.
A key aspect of the proposal lies in the research sources used to develop the idea. Although I would argue the first and most important step to look at is the generation of ideas to begin with. We need to create a list of potential ideas to start with, then narrow down and refine them as we go along. So, responding to the brief (examining and breaking down the criteria) will let me know EXACTLY what I am being tested against. Looking into existing examples of my ideas will further my understanding of how the industry would respond to it. It will also give me insight into how’s best to justify why I am carrying out this idea. I will then thoroughly evaluate and analyse these ideas and proceed to eliminate the weaker variations. This will also let me poke holes and develop other ideas. This process of narrowing and refining will carry on until a single idea remains.
Overall, I am looking forward to this project. With the freedom it provides, I show be allowed to be left to my own devices in developing it. I have control to take it anyway I please. So At this point…BRING IT ON.
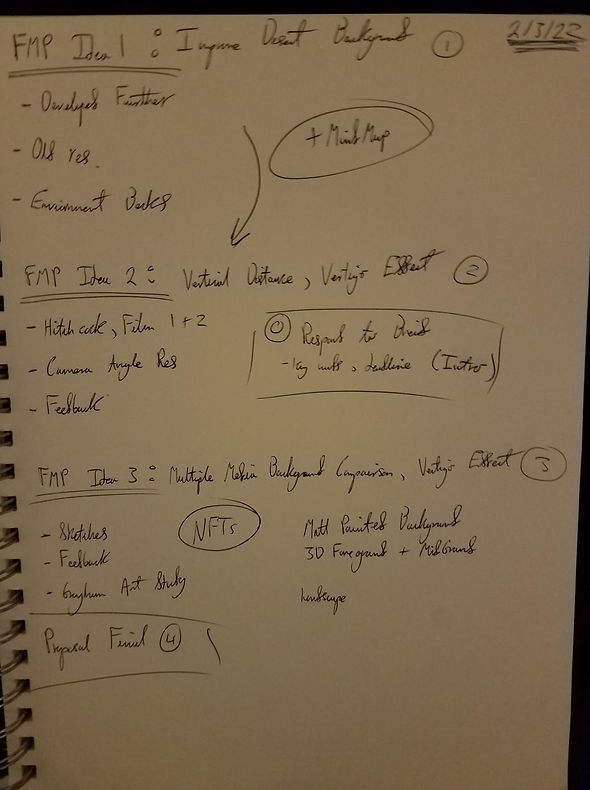
MINDMAP NO 1


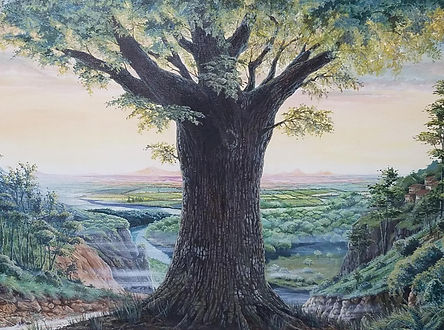
Before we do anything, it is important to start generating some rough ideas. Mind maps are an excellent way to process bits and pieces of information and creating a visual representation. I began to look at previous projects of mine for inspiration. Across the last 2 years, there have been many concepts I have wanted to try but not had the timeframe nor the skill to pull off. With a year and a half experience and a longer deadline, that's no longer an issue (to some extent). For example, my first FMP explored and experimented with the idea of fire and water characters. My understanding of each was little to none back then. This FMP would create a perfect opportunity to explore the physics of one or the other and apply it to an artwork. Likewise, there is a LOT of artworks inspired by these elements. It also would allow to conduct real life experiments, a personal favourite method of research used throughout my old projects. Although to pull off such a feat would require me to learn a new software - Houdini. This would let me apply real-world physics into my scenes. The main object would be learning how to create and manipulate water or fire. A treck into VFX would be a completely new adventure and a huge swing out of my comfort zone.
There is also the equally complex idea of combining 3D and 2D mediums together in digital software. I know Blender's main selling point is the fact it can achieve such a task. Initially, my 3D experience was far too new to even think about attempting something so ambitious. Although this would involve an extreme number of new tools to pull off. For starters, I currently have no idea how the 2D features in Blender work. Likewise, I have little to no idea how to successfully apply the 2.
The two ideas above are the most extreme in terms of ambition to pull off, as well as the least experienced areas of mine. So, looking into safer plays for this project would consist of improving my 3D environment background. This was a brand-new idea for me during the last project. The sole purpose of it was to explore the process and methods of creation in prep of this FMP. Because of this, I now have a foundational knowledge in what is involved - which is an advantage compared to the other 2 ideas. Although would it be too safe? In improving a piece of artwork that already exists, would I be leaving too little room to explore?
A middle ground to the above would be to create an entirely new background. I could attempt to incorporate pieces of all 3 ideas into a new artwork. Depending on the theme of the scenery, small elements of fire and water can be included. Likewise, I can take similar elements found in a desert (besides pyramids). For example, Ravines. cactuses. oasis’s, desert towns and desert animals. Rocky terrain would be ideal since it's simple to light and non-reflective.
So in response to all this, I will begin to experiment on the background that already exists. This will give me a good indication as to what other directions I can take it. This will also refresh my skills learnt from the past project and Unreal as a software. Even if the purpose of me creating a background boils down to self-improvement, I’ll take it. I want to push my skills as far as possible, while not getting too ambitious to the point I miss my deadline.
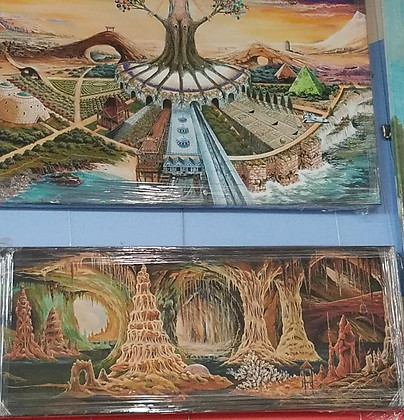
IDEA NO 1 - PYRAMID 3D BACKGROUND CONTINUATION

REFERENCE
Entertainment, W., 2019. How to create a low poly branched tree in Blender 2.8. [Online]Available at: https://www.youtube.com/watch?v=V0LyhVM6ILk&list=LL&index=5&t=183s[Accessed 28 February 2022].
HIGHFIELD, C., 2022. 3D Environment Design - Pyramid and Balloons. [Online]
Available at: https://www.artstation.com/artwork/xYq6yW
[Accessed 7 March 2022].
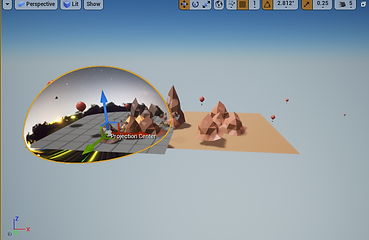
The images above are taken from my previous project. This was the end result of 5 weeks of development. Below lies the work I have done outside the old project - freshly created for this FMP. Any uploads to Artstation or Instagram were done so after it was added to this website. Any evidence taken from previous work will be referenced to avoid plaguing myself.
ROUGH PROPOSAL 1 - PYRAMID IMPROVMENTS
So, a potential idea that sounds promising to develop is my pyramid 3D background. This environment design was initiated during my previous project – exploring a chosen discipline. I will require a competent understanding in modelling, texturing, lighting and potentially animating. Considering significant progress has already been made, I can build off the skills created from before. My knowledge in texturing is still very weak. So, this issue will need to be solved through practice and dedication. Likewise, my understanding of lighting is very limited. Perhaps research into academic film methods will be useful. The pyramids themselves can be developed much more, as right now the original model block out is being used. The evaluations will delve deeply into each subject matter. I will outline the strengths and weaknesses, my personal feelings, how I will improve it and how the section went as a collective. Research for further development of this idea will include YouTube tutorials on new skills and techniques in developing my background. Academic sources on 3D design will come in handy. Examples out of books, films and other artists work will help significantly as visual references.
I also need to do further research into how I will write up my proposal. I am aware I need to talk about past skills, research methods, evaluating methods and the concept of my idea. In terms of how I structure my thoughts is left to be discovered. Going ahead, it would be easier for the viewer to have these sections headed. That will make it clearer for the markers of this website. In a wall of text, valuable information could be missed. Marking work Is a subjective task that is heavily impacted by the marker. So, it is my responsibility to make it as clear as possible. I will help this solution be adding BRING RED ARROWS to mark out research sources. I will also break up my writing better going forward to show how each individual area has been identified and answered. Likewise, getting other academics and mentors to proofread my documentation will outline any errors I may have missed.
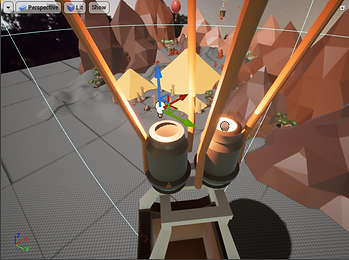

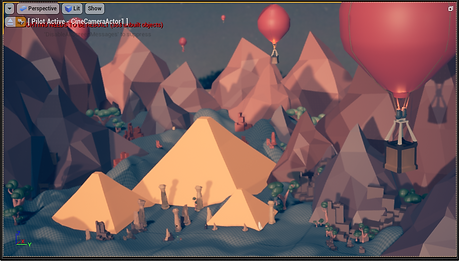
So, the first thing I did was dim down or remove any light sources still in the scene. The NDR skybox was adjusted to more represent night. The original idea was to set it up at night after all. It was by complete accident that a sunset scene exists. During an old mini project. I experimented with smoke particles and destruction physics of a building. It was at this time i used a trick to create the illusion of flame. I animated a light source and change the colour and intensity. Due to the distance of the hot air balloons to the camera, we are far enough away for the glow to look like flame. I experimented with directional light first - which lit up the entire area it pointed at. So, I decided to add point lights instead in the cylinders (seen in the screenshot).
Against the night sky, these glow effects really stand out and add more life to the balloons. The further away balloons had their light source place next to the balloons, rather than in the engine cylinders. A greater illumination occurs which is why the glow is still visible in the camera perspective. The sky box was also scaled and transformed to include the very back assets - improve the depth of field. This is evident when comparing the screenshots above side by side. Overall, I would say that my prior experience with the old project has greatly improved my navigational skills of Unreal. I no longer need to worry about how to move around my scene. I know how to add materials and textures, how to light, how to layout a scene....
The process I am using to explain my work down is similar to how i will be evaluating my project throughout.

The next step was to add a directional light. This almost acts as a camera light that illuminated the desert scene below,. In doing so, I can create shadows of the assets to add an extra layer of detail. this will also allow me to further break up the block colours. Speaking of colours, I also noticed the pyramid models are much to vivid compared to the rest of the scene. I will have to adjust this so it fits with the other assets.

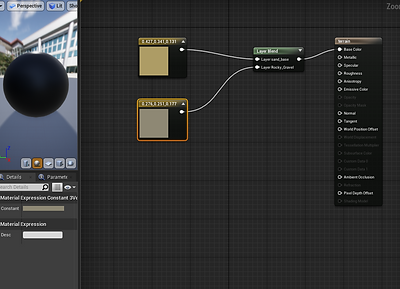
Now it is time to learn a new skill. During extra 3D lessons, my teacher showed me a new way to texture. He created a single material and showed me how to map the node views and which setting to adjust. After he shows me how to apply it to my scene. I then did the same thing with 2 new materials and began to create the floor of my background. The node view is a confusing area for me personally. The more I have used it, the easier it has become to navigate. Although memorising the shortcuts and the options available is difficult. Once the node view was correct, there was still a matter of deciding placement of these new materials.
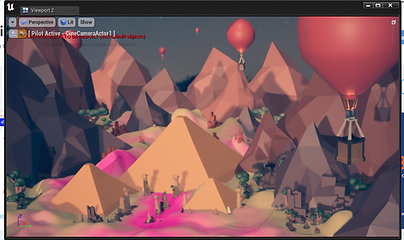

All of this led to the outcome of a night and sunset pyramid. After a brief feedback session with a handful of games students. It was unanimously with the sunset being best. Mostly due to how the softer lighting compliments the setting sun.
With that the background is complete. Any more work added to it and I will lose the desired theming. The simplicity will become too complex. Anymore and the identity will be lost.

So that leaves this idea in a predicament. Any more progress and we would essentially change the very identity of the piece. the original aim of the last project would no longer apply. So, we could solve this by remaking the background from scratch. Although what would be the purpose of that? We already have a pyramid background with a purposed stylisation. We would only be re-treading old ground with a new visual look. If we were to make a new background, wouldn't it be better to pick a new theming? Let’s focus on a new subject matter that lets us explore something new. This pieced on creating the illusion of distance through horizontal depth, so what’s to stop us attempting the same thing vertically? What other ways can I convey distance? What new methods would I need to do this. Research into camera angles and perspective would be essential for such an exploration. Academic sources into filmography would also help.
Although saying that, we wouldn't want to go too far off the beaten trail. background design in 3D is still a very new area of exploration. We still want to be able to apply the techniques learnt from before. While ambition is always encouraged. We still need to think what can be done in the deadline provided. Experimenting with too many new elements can lead to a monumental number of issues to fix later down the line. A fine balance between innovation and the tried and tested formula needs to be reached. Further investigation will be needed to refine my idea of background design.
The time taken to further improve old work has been extremely useful. It has helped me narrow down my idea and cut down my list of potentials. We have written off the idea of improving the old backgrounds. We have decided to create a new background. This least us explore new theming and explore new territory.
PERSPECTIVE AND CAMERA ANGLE
RESEARCH PART 1 - 7/3/22

My ideas must be backed up with research. So although it will be limited here. I do want to say a brief piece about each source I use to evolve my idea. I will be saving the full breakdown of the research sources for the production part of my project.
The very camera shot can completely change the feel of the scene. I know that the angle my camera is shot at can completely change the emotion conveyed to my audience. For example a extreme wide shot is "used to visualise from a long distance, to show landscapes or to give the sensation of a huge space." This is according to a website called 2 The Psychology of Camera shots". They also say that these sort of shots "give a disaster sensation". If we compare this to the extreme close up, we realise just how contrasting the effects become. On it's own, it apparently has little psychological effect. "However if it comes, for instance, with a general shot, it can strengthen the action." So while a extreme wide shot is used to convey long distances and bring a sense of disaster, an extreme close up is used to heighten the effect of the previous shot.
This is only a singular example of how camera shots have different affects on the audience. In order to verify this information, I would have to research into multiple sources. A single website cannot be used in isolation as a reliable source. Research needs to be cross-referenced to increase validity. So as a quick fix, I began to look at Studio Binder's website and see what they say about these two shots. They say that the extreme wide shot "makes your subject appear small against their location" and that "you can use an extreme wide shot to make your subject feel distant and unfamiliar". "It can also make your subject feel overwhelmed by its location". This falls similar in line with the "disaster feeling" mentioned in The psychology of camera shots. With multiple website sharing very similar information, we can deduce the source is likely genuine. Studio Binder also possess much more information delving into camera shots, positions, focus, equiptment... This source will be a brillant addition when researching the filming side of my 3D scene.
PYRAMID EVALUATION ROUGH NOTES
no where to take this
better off with new background
achieved depths and distance horozontally
begin research into how else i can convey distance
MINDMAP NO 2

So, I have established that simply working on the old environment would not leave enough room to show off my skills. However, the idea of creating a new background from scratch is still on the cards. The Pyramid background focused on creating the illusion of distance by using depth to its advantage. Horizontal distance was created through re-sizing and overlapping items. It also introduced me to new areas such as texturing and UV mapping. This time, I want more of a focus on the filmography of the scene. Introducing animated elements such as camera movement, particles and active lighting are all up for consideration. This mind map takes some of my ideas looking at various camera angle types - exploring what themes could work with each. For example, looking down a skyscraper for that vertical distance. Likewise, we could expand off what we achieved with the pyramids. This time I could put more emphasis on the style and adopt a more realism approach focusing on nature. I could exaggerate the distance through themes such as small world, underwater city and forest clearing. Each idea and theme coming with its own good and bad points.
Personally, I like the whole idea of focusing on a ravine. This would be a similar theme to the pyramids in terms of the physical environment. Both very dry deserts, both simple to execute. So, I am learning towards the ravine idea, we will just have to see what happens from here.
MITCH PITCH, CLASS EXCERSISE BEGIN - 21/2/22
So the first activity in official lesson was to present my new rough idea. I would of been contemplating what to explore for this FMP since the end of the last project. This task was sprung upon us by our tutor, Mitch. The task was to create a presentation to pitch our idea for the FMP. We had 20 minutes to outline what we would do, how we would do it, research sources, timeline, software’s...
The result of this can be seen on the right. So overall, this deep dive was extremely rushed. We had little time to prepare and no notice in advanced. The end of the pitch resulted in Mitch providing feedback on our idea. He essentially shot it to pieces to underline any holes that needed fixing in preparation for the proposal write up.
Although difficult, this task was extremely useful. The feedback provided not only made me aware of issues to fix, but actually gave me a jumping off point for my research. Mitches feedback was taken in rough note form below - written quickly as he said it. it made me aware of several aspects to contemplate. For example, what the purpose of my artwork is, what is my target audience and where to look for my research sources.


REFERENCES USED FOR PITCH POWERPOINT
Highfield, C., 2022. 3D Environment Design - Pyramid and Balloons - UNFINISHED. [Online]
Available at: https://www.artstation.com/artwork/xYq6yW
[Accessed 21 February 2022].
Highfield, C., 2022. CASE STUDY: 3D ENVIORNMENTS. [Online]
Available at: https://editor.wix.com/html/editor/web/renderer/edit/ab4b605d-0b4f-4196-8887-a90ceee2653d?metaSiteId=e82fe4dc-acf6-4f0b-9eb2-be30cac6033c
[Accessed 21 February 2022].
Although I did struggle to present and create a pitch in the space of 20 minutes alone. The timeframe left all requirments down to the wire. Much of the idea going into this pitch solely consistent of creating a background. The depth and substance to my concept did not exist prior to this exercise. It forced me out my comfort zone and pushed me to think deeper.
Much of the details to my idea were essentially created on the spot. Research will be of upmost importance in order to create a successful proposal and much be carried out! If my idea is not informed by research material, then I will be locked out of the higher grade brackets.
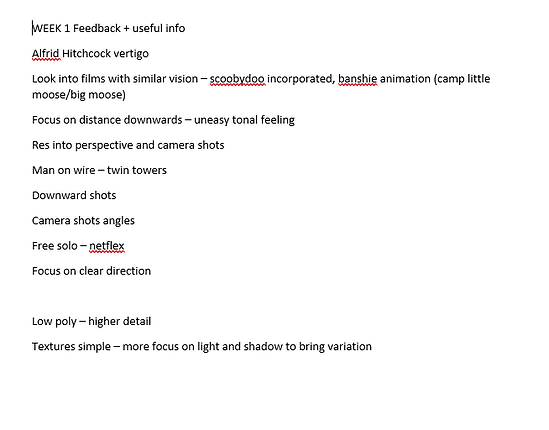
Mitches research tips began with Alfred Hitchcock, a film director best known for classics such as vertigo (secret-bases, n.d.). Although the initial research I gathered for this film came from a Wikipedia like website. It was formatted the same way and even as wiki in it's website link. Although this source is extremely useful for a starting point and general overview, it's validity is questionable. Sites like Wikipedia can be altered by anybody. The information shown may not be accurate to the truth. So although this source was found on google scholars and is classed as 'academic', this needs to be looked into further with greater range of sources.
TIMETABLE NO 2 - 22/2/22
During class, I also began to create a timetable in preparation for my proposal. For future context, just because I completed work in class does not mean it wasn't independent. The staff have made it very clear that this project is left to our own devices for most of the time.
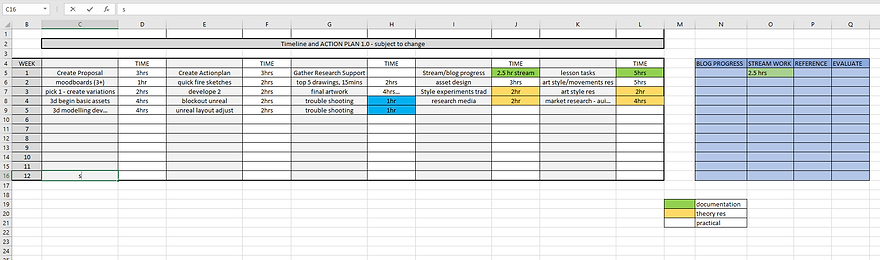
So, the structure and layout were completely up to me. I decided to attempt a week-by-week format, initially shown in my pitch to Mitch. The 8th slide of the pitch shows a red timetable with a very rough idea of how I will structure my time. This was brought forward into the rough proposal plan below this paragraph. While the timetable above was an improved version of the previous 2. Comparing these 2 side by side highlights some major differences and consistencies. Although these are structured similarly, timetable 2 goes into much more detail with each specific task. For example, outlining the block out and initial creation of 3D assents over timetables 1's "modelling" box. Timetable 1 contains very little information on the process of my background creation outside of vague and basic methods. Timetable 2 also improves off no 1 by laying out dedicated slots for independent research, a much-needed resources to succeed in the FMP. Timetable 2 also uses colour with purpose, unlike no 1, by colour coding specific events within the weeks. However, both contain a massive issue - the fact that they stop around the 5th week. The solution to this is to plan further ahead and delve deeper on what this project will consist off. However, the further ahead I plan, the less likely it will be followed. Issue occurs that cause delays. New techniques are discovered that take up time. Technology may play up, leaving me unable to access crucial software at critical moments.
That is why during the 20mins to create a pitch, my timetable remained barren. The issue was not solved in the creation of timetable 2 - leaving a big hole in my future plans. I intend to create a 3rd version of the timetable, or improve off the 2nd, to fix this issue with a suitable solution.
IDEA NO 2
ROUGH PROPOSAL PLAN 2 - 21/2/22
I have learnt skills that greatly benefit this project from across the last 2 years. For example the 1st project I ever did was an environment design, where I flooded the street of my bedroom window in photoshop. During this project, I learnt the fundamentals of colour theory, basic evaluation structure and the importance of feedback to improve my work. It wasn't until the very end of year 1 that I started experimenting in 3D. and since the beginning of year 2, I have made an effort to keep exploring the medium alongside any school projects. I also began to take external artclasses to improve my traditional skills outside the college in my Independent time. During my external art classes in year 2 term time - I began to explore perspective in 1 and 2 point for my portfolio. The project I carried out previous to this fmp was a crash course through the production process of 3D background design. This eventually lead to discovering my current understanding in how to create an environmental concept sketch out of a single moodboard. I began to explore the discipline of background design and it's place within the animation industry. And after the fun I had in creating my desert scenery, I decided to pursue this route as a potential career option. That is why I have decided to create another background design for my final major project of year 2.
The key focus of this project is to explore and develop my understanding of background creation. Specifically I will experiment and develop backgrounds in an 3D medium. Thankfully, I have already begun to dabble in this topic prior to the yr2 fmp. My previous project (project 2 - task2) also aimed to create backgrounds in 3D. However that project was incredibly limited to the 5 week timeframe set. This enlightened me to the necessary processes taken during creation as well as what problems to avoid. My intention is that with a 3 month deadline, I can push the boundaries of my artwork much further than before. Granted there will be more issues to fix as a result of diving into unknown territory. Although all such problems will be solved, documented and carefully evaluated throughout the project. I will solve them with critical and calculating action, backed up with various research sources. The main aim of this project is to see how far I can push my environment concept art within traditional and digital mediums. While the 5 week project focused on achieving the illusion of distance with horizontal depth, I will attempt to do so vertically this time. Through careful research and planning, I will attempt to mimic the feeling of vertigo humans get standing too close to a high up edge.
I will begin be creating multiple sketches ranging from 5 to 10 minutes. After several different concept sketches, created using collected references, I will begin to narrow down my vision until I am left with a single A4 artwork. This will then be translated into a 3D blockout. Modelled in blender and layout in Unreal. The models will then be improved and the art style experimented with multiple times. Art style experimentation will delve into UV unwrapping (blender), texturing (Adobe Substance) and further layout changes. I also want to experiment in Houdini in an attempt to create realistic physics within my scenery. The models will still be low-poly although much more detailed than the previous background. The texturing will remain simple due to my limited understanding and experience. I know from last project that this area is so huge, It wouldn't fit into my timeframe to competently learn it in time. I will instead using lighting and shadow to compensate. Early into the production process, I need to research how to adapt my work to my target demographic. This is Young Adults (age 13-25). I want to target the thrill seekers and those looking for that adrenaline rush. This age range is notorious such that. Although this will require research to confirm and may even lead to a change of audience if results come back different.
Visual references will include film sources (Alfred Hitchcock - Vertigo), moodboards created from internet images and photographs taken by me in the real world. Other references include academic sources on film making techniques (especially perspective and camera shooting techniques), social research sources such as YouTube videos and market research into my target audience. I intend to use a combination of primary and secondary research to support my artwork. By analysing other artists within my discipline, I could incorporate their techniques into my work. Likewise books and YouTube tutorials will achieve the same purpose. The actual size of their individual impact will have to be monitored and evaluated once used.
My evaluation will be simple in execution but contain multiple parts. Each piece of documentation (research sources and experimentation) will be broken down and split into pieces. While some pieces may contain a breif evaluation, other more important parts will be thoroughly analysed. I will evaluate the strengths and weaknesses of each, comparing it to it's other options. I will give my personal feelings and experiences on each as well as discussing it's impact on the project as a collective. Parts that directly link into my artwork will be called out, while other pieces will play support into creating solutions to issues. This will finally be followed up with how I will take it further and what I would do differently next time, given the situation arises again. This format will be provided as written evidence and as a video blog. I will document my references and inspirations to potential problem solving (practical and theoretical). Hopefully with enough feedback, I can adapt and improve my process of evaluating.
ROUGH TIMEFRAMES
21/2 - 27/2: Week 1 will focus on defining my proposal, possible research sources, creation of timeline to plan the production and documenting my work.
28/2 - 13/3: Week 2/3 will be spent creating the concept sketches in a sketchpad before official 3D background creation begins. I will also gather further research sources to use alongside my work.
14/3 - 27/3: Week 4/5 will be spent creating the blockout for my background, using a combination of Unreal4 and Blender.
28/3- 30/4: Further develop my background. Experiment with new techniques in Unreal, Blender and learn Adobe Substance and Houdini from scratch
1/5-13/5: Research into platforms to present my work, exploring the various ways this can be achieved. I will examine and evaluate their strengths and weaknesses, as well as their suitability. I will also present my work on the decided platform to the target audience layed out in my project prior.
123, T. R., 2022. TOXIC RAVEN 123 - Channel Updates and Chilling. [Online]
Available at: https://www.youtube.com/watch?v=xmKsCQCdohc
[Accessed 21 February 2022].
STREAM OF WRITTEN PROPOSAL - 21/2/22
So far, much of my documentation has remained in the form of writing and screenshots. This format allows me to show visual evidence, while collecting my thoughts in a structured order. However what about other means of providing evidence? Why not livestream my work?
So as I was creating the 1st draft of my proposal, I decided to livestream my progress on YouTube. This allowed me to show off my methods in it's rawest form. Every mistake I made, every time I problem solved and all progress documented, uncut and unfiltered. This gave me much more freedom when it came to presenting my work onto this website. Not only did it save time but it also provides a much better visual source than a single screenshot.
It also allows viewers of my work to interact with me and provide live feedback. I can make changes and react to feedback during the creation process itself! Although this method has some drawbacks. For starters, the sheer quantity of footage recorded means that valuable information may be lost amongst the useless. Not every second of those 2+ hours is needed. Likewise there is no guarantee of important feedback amongst the viewers, much less people would turn up to begin with. Accurately documenting any sources during stream may become an issue too. With so much footage, capturing all external sources will be difficult. When it comes to writing and images, they do not have the same flaws that a stream does. All external sources are applied directly onto the Wix site. There is little error of evidence getting missed. Writing also allows you to structure your approach, making it much more effective at presenting your vision/ideas. With streams, the message runs the risk of getting lost in the bulk of footage. Both methods of documenting my work are useful in their downright. Both methods have their strengths and weaknesses, as outlined above. Both are good for different reasons. So what I will do going forward is to use a combination of both. That way they will cover each other’s flaws and I can reap the benefits of both. The comparison made above has help greatly to filter each down to it's fundamental levels. I intend to experiment with a further method of documentation later down the line to see if I can improve this further in my project.
MENTOR FEEDBACK - 22/2/22 + Evaluation Method Analysis -1/3/22
Feedback is going to be extremely necessary during the entirety of my FMP year 2 project. A reason for this is held within my main evaluation method, the Gibbs cycle. This cycle allows for detailed and effective analysis of the areas its being written about. This applies to both artwork and research sources alike. Although, relying on the same means of evaluation through my project may lead to some problems (for now theoretical issues). The model is only effective through the knowledge I possess at that moment. You don't know what you currently haven’t learnt yet. This limits the scope of the scale of my website breakdowns. A solution to this, discovered in an interview with a mentor, is to seek out feedback throughout the duration of the project. This means my knowledge is expanded to what other people know as well as what I know. It means others could identify key aspects that I missed. They could have completely different ideas that change the direction of the project. They could also spot glaring errors that are highly important to fix. Feedback fixes a lot of the weakness that the Gibbs cycle has. It seems a common trend of combining several methods to complete the same goal is occurring. This process of methodology allows for multiple flaws to be covered while being rewarded from multiple benefits of each. The only issue with this is time. Every new form of research, evaluating, documenting... takes time. And with each new layer of complexity comes the issue of time management. My deadline must be priority.


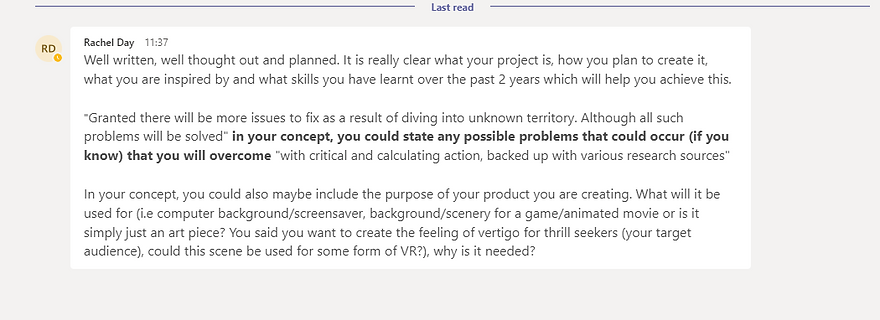
Above contains the feedback I acquired from 3 mentors on my college course. While 2 directly feedback upon the proposal, 1 covers the project idea overall. The interview with Rachel finds key question to answer within my proposal as well as some small changes of wording. Being more specific to any issue that will come up was a key example. Jay's interview focused on the evaluation methodology. His was the key reason I started looking about how to avoid the flaws of my main form of evaluation - the Gibbs cycle. It was through this feedback, that the idea of collecting feedback, surveys and exploring characteristics of art can improve my project. Finally, we have the interview with Darren. He covered similar points to the feedback from Mitch, e.g., the suggestion of Alfred Hitchcock films. Although he took it one step further with possible research suggestions lying with looking into Surrealist Art Styles and Salvador Dali. Each interview brought something new to the table and each had a significant impact on my proposal. It was thanks to the feedback Jay and Rachel provided; I was able to write the 2nd draft of my proposal below. While Darren and Mitch's feedback allowed for multiple avenues of research sources to explore.
Considering how effective this feedback was, I will carry on this form of gathering research for my project. I can always compare this mentor feedback to other students’ advice, random people off the internet or family.
ALFRED HITCHCOCK - RESEARCH PART 1

The first thing I needed to do was outline exactly the feeling I wanted to achieve. What is it? How do I create it? My powerpoint presentation describes how I want to create a feeling of vertigo with vertical distance. Well according to Doctor Doctor, they outline vertigo "as the feeling that you or your surroundings are moving when they are actually still" (Doctor Doctor, 2017) . "It is often described as feeling like you are turning, spinning, tilting or falling." It is important we are aware of the exact definition of what we shall explore. This may also break down and give insight into how said feeling is achieved. So we now have the feeling described as well as associated feelings to run alongside it.
This research comes from a medical site. So although it contains high validity of describing symptoms, It won't give much insight into how to create it within media. For that we need to find an example of a prominent figure in the creative industry.
Luckily, we already have a name from our tutor feedback. Mitch recommended I investigate Alfred Hitchcock, specifically his film 'vertgo'. According to Wikipedia, "Vertigo is a 1958 American film noir psychological thriller film directed and produced by Alfred Hitchcock." "It is the first film to use the dolly zoom, an in-camera effect that distorts perspective to create disorientation, to convey Scottie's acrophobia. As a result of its use in this film, the effect is often referred to as "the Vertigo effect"."
Straight away, we were greeted with useful info. With a quick google search, Hitchcock was clearly an important director with an expansive legacy.
DoctorDoctor, 2017. Understanding Vertigo: Dizzy or Just Lightheaded?. [Online]
Available at: https://www.doctordoctor.com.au/understanding-vertigo-dizzy-just-lightheaded/
[Accessed 27 February 2022].
Vertigo. 1958. [Film] Directed by Alfred Hitchcock. United States of America: Paramount Pictures.
Wikipedia, 2022. Vertigo (film). [Online]
Available at: https://en.wikipedia.org/wiki/Vertigo_(film)#:~:text=Vertigo%20is%20a%201958%20American,Coppel%20and%20Samuel%20A.%20Taylor
[Accessed 27 February 2022].
Driscoll, P. A., 2014. “The Hitchcock Touch”: Visual Techniques in the Work of Alfred Hitchcock. [Online]
Available at: https://scholarworks.bgsu.edu/irj/vol1/iss1/4
[Accessed 27 February 2022].
THE DOLLY ZOOM - RESEARCH PART 1
eva
no where to take this
better off with new background
achieved depths and distance horozontally
begin research into how else i can convey distance
Shields, M., 2021. How Does the Dolly Zoom Work?. [Online]
Available at: https://filmschoolrejects.com/dolly-zoom/
[Accessed 28 February 2022].
StudioBinder, 2019. The Dolly Zoom Effect: Cinematic Camera Movements in Film [Vertigo Effect] #dollyzoom. [Online]
Available at: https://www.youtube.com/watch?v=ttZAdY3n4nc
[Accessed 28 February 2022].
REWRITE OF IDEA NO 2
ROUGH PROPOSAL NO 3 - 27/2/22
Rationale
I have learnt skills that greatly benefit this project from across the last 2 years. For example, the 1st project I ever did was an environment design, where I flooded the street of my bedroom window in photoshop. During this project, I learnt the fundamentals of colour theory, basic evaluation structure and the importance of feedback to improve my work. It wasn't until the very end of year 1 that I started experimenting in 3D. and since the beginning of year 2, I have made an effort to keep exploring the medium alongside any school projects. I also began to take external art classes to improve my traditional skills outside the college in my independent time. During my external art classes in year 2 term time - I began to explore perspective in 1 and 2 point for my portfolio. The project I carried out before this FMP was a crash course through the production process of 3D background design. This eventually led to discovering my current understanding in how to create an environmental concept sketch out of a single moodboard. I began to explore the discipline of background design and its place within the animation industry. And after the fun I had in creating my desert scenery, I decided to pursue this route as a potential career option. That is why I have decided to create another background design for my final major project of year 2.
Concept
The key focus of this project is to explore and develop my understanding of background creation. Specifically, I will experiment and develop backgrounds in an 3D medium. Thankfully, I have already begun to dabble in this topic prior to the yr2 FMP. My previous project (project 2 - task2) also aimed to create backgrounds in 3D. However, that project was incredibly limited to the 5-week timeframe set. This enlightened me to the necessary processes taken during creation as well as what problems to avoid. My intention is that with a 3-month deadline, I can push the boundaries of my artwork much further than before. Granted there will be more issues to fix due to diving into unknown territory. Although all such problems will be solved with time. Examples of upcoming issues are applying new stylisations within an 3D medium, learning 2 new software’s (Adobe Substance and Houdini) and completing my artwork within the time frame allocated. Solutions will be discovered through critical and calculating action, backed up with various research sources and experimentation.
The main aim of this project is to see how far I can push my environment concept art within traditional and digital mediums. The goal of this project and purpose of the artwork is self-improvement. While the 5-week project focused on achieving the illusion of distance with horizontal depth, I will attempt to do so vertically this time. Through careful research and planning, I will attempt to mimic the feeling of vertigo humans get standing too close to a high up edge. I will begin to create multiple sketches ranging from 5 to 10 minutes. After several different concept sketches, created using collected references, I will begin to narrow down my vision until I am left with a single A4 artwork. This will then be translated into a 3D block out. Modelled in blender and layout in Unreal. The models will then be improved, and the art style experimented with multiple times. Art style experimentation will delve into UV unwrapping (blender), texturing (Adobe Substance) and further layout changes. I also want to experiment in Houdini to create realistic physics within my scenery. The models will still be low poly although much more detailed than the previous background. The texturing will remain simple due to my limited understanding and experience. I know from last project that this area is so huge, it wouldn't fit into my timeframe to competently learn it in time. I will instead be using lighting and shadow to compensate. Early into the production process, I need to research how to adapt my work to a targeted demographic. I want to target the thrill seekers and those looking for that adrenaline rush. To narrow down my audience for such purpose will require further research.
Visual references will include film sources (Alfred Hitchcock - Vertigo), moodboards created from internet images and photographs taken by me in the real world. Other references include academic sources on film making techniques (especially perspective and camera shooting techniques), social research sources such as YouTube videos and market research into my target audience. I intend to use a combination of primary and secondary research to support my artwork. By analysing other artists within my discipline, I could incorporate their techniques into my work. Likewise, books and YouTube tutorials will achieve the same purpose. The actual size of their individual impact will have to be monitored and evaluated once used.
Evaluation
My evaluation will be simple in execution but contain multiple parts. Each piece of documentation (research sources and experimentation) will be broken down and split into pieces by using the Gibbs reflective cycle. While some pieces may contain a brief evaluation, other more important parts will be thoroughly analysed. I will rely heavily on analysing the strengths and weaknesses of each evaluation, with many comparisons made throughout. I will give my personal feelings and experiences on each as well as discussing it's impact on the project as a collective. Parts that directly link into my artwork will be called out, while other pieces will play support into creating solutions to issues. This will finally be followed up with how I will take it further and what I would do differently next time, given the situation arises again. Although a weakness to this method of evaluation is that I can only go as far as I know up to that point. I can only break down what I can see, my level of knowledge into specific areas may not be suitable enough for additional development. I will solve this be constantly asking for feedback throughout my project. Other people will see areas that I will miss. Academic mentors have a lot more experience than myself – therefore they will spot any subtle improvement opportunities I might miss. Likewise, feedback from my target audience will help me mould the project with the intended viewers in mind. This can be carried out through surveys, interviews, and online messages. The evaluation documentation will be a combination of written evidence and as a video blog. I will document my references and inspirations to potential problem solving (practical and theoretical).
Action Plan - 25/2/22

Above I present a fini9shed version of my timetable. Timetable no 2 was no where near ready for the previous proposal. This was due to the fact that I had a massive space of weeks where I was unclear of the direction. This small issue was fixed. I throught of all the new techniques, processes, sources and ideas I wanted to excute. Then I throught how much time is needed in order to do them well.
With this mindset, I was able to finish a improved version of the original red timetable. What I need to do now is analyse my idea to see if every aspect has been accounted for. Likewsie I need to see if there are any unuseful areas to remove. This section is as standard as it gets and I felt no particular emotion torwards it. Although If I was to do this again, I would arronge the weeks on the top axis. That way I can simply have an endless scroll down.

PROPOSED RESEARCH - (27- 28/2/22)
Arc, B., 2020. How To Add Fog & God Rays in Blender (EASY Volumetrics). [Online]
Available at: https://www.youtube.com/watch?v=jYym08606mw
[Accessed 28 February 2022].
Art, R. K., 2020. How to make Realistic Rocks using Blenders Rock Generator. [Online]
Available at: https://www.youtube.com/watch?v=4hdLx9mlizM
[Accessed 28 February 2022].
DoctorDoctor, 2017. Understanding Vertigo: Dizzy or Just Lightheaded?. [Online]
Available at: https://www.doctordoctor.com.au/understanding-vertigo-dizzy-just-lightheaded/
[Accessed 27 February 2022].
Driscoll, P. A., 2014. “The Hitchcock Touch”: Visual Techniques in the Work of Alfred Hitchcock. [Online]
Available at: https://scholarworks.bgsu.edu/irj/vol1/iss1/4
[Accessed 27 February 2022].
Entertainment, W., 2019. How to create a low poly branched tree in Blender 2.8. [Online]
Available at: https://www.youtube.com/watch?v=V0LyhVM6ILk&list=LL&index=5&t=183s
[Accessed 28 February 2022].
GEEK, C., 2020. How to Create Low Poly Rocks in 1 Minute. [Online]
Available at: https://www.youtube.com/watch?v=4EqLyGsu3AA
[Accessed 28 February 2022].
Jacobs, S., 2007. The Wrong House The Architecture of Alfred Hitchcock. Rotterdam: 010 Publishers.
RenderRides, 2019. How to make an Atmospheric Scene under 10 mins! | Blender 2.8 Tutoria. [Online]
Available at: https://www.youtube.com/watch?v=FlNF4X2Koqw
[Accessed 28 February 2022].
secret-bases, n.d. Vertigo (film). [Online]
Available at: https://www.secret-bases.co.uk/wiki/Vertigo_(film)#References
[Accessed 21 February 2022].
Shields, M., 2021. How Does the Dolly Zoom Work?. [Online]
Available at: https://filmschoolrejects.com/dolly-zoom/
[Accessed 27 February 2022].
StudioBinder, 2019. The Dolly Zoom Effect: Cinematic Camera Movements in Film [Vertigo Effect] #dollyzoom. [Online]
Available at: https://www.youtube.com/watch?v=ttZAdY3n4nc
[Accessed 27 February 2022].
Tips, S. F., 2018. The VERTIGO EFFECT with a Drone - Explained. [Online]
Available at: https://www.youtube.com/watch?v=UrhtKvBMZ3g
[Accessed 28 February 2022].
Vertigo. 1958. [Film] Directed by Alfred Hitchcock. United States of America: Paramount Pictures.
Wikipedia, 2022. Vertigo (film). [Online]
Available at: https://en.wikipedia.org/wiki/Vertigo_(film)#:~:text=Vertigo%20is%20a%201958%20American,Coppel%20and%20Samuel%20A.%20Taylor
[Accessed 27 February 2022].
Yangwen Liang, R. R. S. W. D. B. J. L., 2020. The "Vertigo Effect" on Your Smartphone: Dolly Zoom via Single Shot View Synthesis. [Online]
Available at: https://openaccess.thecvf.com/content_CVPRW_2020/html/w21/Liang_The_Vertigo_Effect_on_Your_Smartphone_Dolly_Zoom_via_Single_CVPRW_2020_paper.html
[Accessed 28 february 2022].
This research was gathered to prepare me for the production of my idea. It also acted as a great recourses in fleshing out the idea, a catch 22.
123, T. R., 2022. FMP Year 2 - Week 1 Blog. [Online]
Available at: https://www.youtube.com/watch?v=qe2SQSo-Fsw
[Accessed 26 February 2022].
BLOG WEEK 1 - PROPOSAL CREATION - 26/2/22
This is officially the first documentation blog of my project. This will be something I do throughout the project to give myself a break from writing. There is an exact criteria specific for documenting my thoughts, progress and direction. A blog will present my unfiltered views week by week on the fmp. Any form of recording will be more loose, less structured than writing. A script could solve this but that defeats the point in my eyes. Rough notes would do the trick over a script and achieve the same impact. Likewise a stream achieves the same purpose as a video, although much more difficult to digest. Livestreams do not have the same re-watchability as a video.
They function best in the moment, for live reactions. This could hold some benefit when working on my experiments. Although for an evaluation, there would simply be too much time in-between the important information. A video could also be edited down to minimise the fluff, unlike a livestream. And finally, Livestreams save as a video format anyway, so it is just a much to long video in disguise. It is for those reason why I am planning to carry out un-scripted videos talking about my work. It will be a more personal experiences for viewers of my website compared to walls of text. Text is the most direct and most visibly evident way of covering the brief. Although a combination of both writing and videos will reduce the weaknesses of each, while strengthening my documenting and progression of ideas very nicely.
DOCUMENTING ISSUE - PRACTICAL PROBLEM - WIX PLAY UP NO 1 - 28/2/22


Although this is a tiny issue, this will be the biggest pain in my neck for the ENTIRE project. And there is absolutely nothing I can do about it. When making a new website, Wix generates and controls the domain. That means if there is a flaw in the controls, I have no access to change them. For some reason, every time I use spell check, Wix completely screws up my line spacing. For a simple mis-spelling, my entire textbox changes line spacing. And it's huge spacing at that! Screenshots of this issue can be seen above and to the left. This means I will have to manually sort out every wrong spelt word, creating many additional hours of work over the course of 12 weeks! It means the writing on my wix site will slow down. It means that long texts for evaluations will be even longer than usual. I can copy and paste my text into work, spell correct it there and copy back in. Although the font then changes completely. Either way wastes a similar amount of my life. There is no viable solution, only small shortcuts to deal with it. The only other possible solution would be to generate a entire new wix site and copy and paste all my current work. But the more I progress, the less of an option this becomes.
NEW PLAN! - 1/3/22

So at this point, I am very happy with where the idea is heading. Although I know it can be improved. The proposal has officially ran into week 2, so I will use the entire week whilst beginning to sketch out my scene. Below I have the new structure for my Proposal documentation website. This shows a much clearer development of ideas than you saw in the blog above. I decided to add my initial throught about improving the old pyramid background. I also decided to idea generate with not 1 but 2 mindmaps. The proposed research in part 2 will be breifly written about on this page. They will be used and evaluated properley with further sources on the production page. However, adding a breif look over here will help further support my ideas. Lastly, I wanted to adapt and improve of the last written breif and finalise the edges.
For example, with the new introduction of sketches, I want to further a traditional version. So for the next breif, I could produce a similar background in multiple mediums. 1 traditional, 1 photoshop and finally a 3D version. The 3D version will take the most priority, with the other 2 playing support. Likewise I can use traditional/digital2D to help design assets and props. I could even use matte painting and incorperate 2D elements into my 3D artwork.
2MIN SKETCH SESSION - NEW IDEA!! - 1/3/22
According to my timetable, week 2 will begin the rough design process of my 3D model. That means if the proposal overruns, I will need to design alongside the final proposal write up. On Tuesday, I attended external artclasses and made some head way into this. I created 7 2minute sketches of my background idea called ravene. Once all 7 were created, no mroe than a basic outline, I asked 2 question to the other people attending.


After my research into the dolly zoom, I had an idea of how I will lay this out. The mood board used as my main visual source can be found at the start of the production page. For this to work - I set the ground rules of a large object in the foreground with a focusing point somehwere further back. This lead to a lot of scenes partially framed with a key area to draw in the eye. Each concept is an idea on its own. While No 1 was a generic desert scene, No 2 played with sharper rock design, more distance as the ravene layed deeper into the earth. No 3 played with hills and rocks at certain positions to lead the eye back. No 4 consisted of an island framed around a rocky border - also introducing water into the scene.
No 5 made the ravene much more pronounced and the main focal point of the scene. While no 6 had the viewer stare directly into the ravene from above. No 7 took this idea and had the ravene split down the center of the page. The rule of thirds was taken from my research and applied to almost every single image. Each sketch built off the one that came before it. Each was done with purpose - testing out a new variation of the idea.
FEEDBACK, 3 PARTICIPANTS + PROFESSIONAL ARTIST - 2/3/22

I asked 2 question to 3 adult artists, other people attending the art lesson. Which one is your favourite and why? Very simple, I did not get a lot of time to interview people. I also kept their names anomorous and labelled them 'participant no 1-3'. Surprisingly, they all had different answers. The responces were breif. No 1 liked sketch 2 due to it's defined purpose and direction. they said it looked similar to the Grand canyon. Having a familar landmark definetly struck a cord with this adult. They also said No 4 looked like it belonged to another world. Although it was made using the same moodboard as the other 6 - it's affect on the audience was dyrastically different.
Participant 2 liked sketch 1 the most on the pure fact it had a sunset. Lastly, participant no 3 said they liked the 5th sketch most. They said it was a "clearer interpritation". they especially enjoyed the cliff edge and valley that streatched out.
When showing these to the experienced artist, I got a much more detailed responce. She personally liked No 5 the most. Her first reaction to the piece was it felt "tall, dangerious and feeled with dread". She went on to say how the bottom left is completely covered up and felt like something was hiding behind it.

She like the way it curved outwards and faded into the distance. It felt "fragile", like it would break at any moment. A massive "element of risk". Her next favourite was No 6 sketch. She talked about how that felt risky and dangerious too. She had the feeling something was peering down at her. This was surprising as I drew it as the viewer looking down into the ravene, not looking up at the bottom.
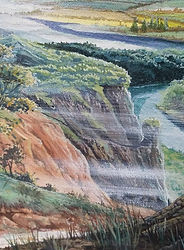
ARTIST STUDY - GRAYHAM
MOODBOARD OF HIST ARTWORK - PHOTOS - 2/3/22


REFERENCE OF WHO IT IS AND TIME ACCESSED - DATE OF CREATION UNAVAILABLE
Graham F.W Collins
Accessed 2nd, March 2022
Date created n/a
Photographs - not uploaded anywhere else
The above are photographs, documented as a moodboard. It details my first hand experience of visiting an art studio and seeing these paintings for myself. Because of that, this section is classified as primary research.
In the same place the external art classes take place - an artist called Graham has an art studio. He was my tutor for 6 years - me being aged 10 to 16. He is a traditional artist specialising in the medium of acrylic paint. Although I am doing primarily 3d digital - there is a lot I can learn in his techniques. The mood board above shows example of his artwork, photos I took in his studio. Because of how long he taught me, the other professional artist called Jenny pointed out how similar our styles were. She said we both have the same eye for storytelling. Highly detailed art pieces. We both bring curiosity to our works and we both like to lead the eyes into sections. This is a paraphrased version of her verbal words to me. This is also part of the feedback I received when showing her the 7 sketches. So in response, I decided to take photos of Grahams work to see for myself.
As expected, my old acrylic heavily resembles his art style. His methods and results are on another level to what I can produce, although the techniques used are largely similar. Although my sketches may be far to small in comparison to his massive acrylic artworks, my pencil work carries the same principles across. Leading the eye, telling a story through detail and the layers of depth. Jenny was right in her observations. I decided to take a photos of the art above specifically because the art style may benefit my artworks. The acrylic art style can be mimicked in photoshop. The traditional pencil and adapt and capture the same shapes and techniques. The 3D could even improve, using these as direct references for texturing. In terms of texturing, I am aiming for a more complex version than the cell shading style previously. Although I am not ready for a full realistic piece. perhaps this style could be a compromise.
What I do know is the more traditional practice and artwork I see, the more I want to incorporate it into my proposal concept idea. I may decide to create multiple artworks of the same environment, comparing the process of each as I go along. I could explore the translation of each medium and analyse their strengths and weaknesses. Heck, I could even attempt mix media and use multiple forms on the same art piece! There is an infinite ways this artist study can be applied. In order to establish a visual style for my artwork (regardless of medium), it will be important to analyse industry professionals and existing artwork. This piece of research is proof of that.
In this case, I will definitely be of bias. This artist taught me how to paint for 6 years. I will hold them in high esteem and that may cloud my judgment. I will need to be aware of my emotions but still attempt to analyse objectively.
If I was to do this again, I would attempt to mimic or create my own version of sections of his paintings. This could give me further understanding of the process involved to make it. It may give me insight into the thoughts and emotions of the original artist.
PROPOSAL NO 4 - FINAL - (2/3/22 - 8/3/22)
Candidate Name – Callum Highfield
Candidate Number – 50543926
ULN Number: 3705871802
Pathway – Creative Media Production
Project Title – Multi-Media Environment Design
Section 1: Rational
As of current, my long term goal is to become an environmental artist in the animation or games industry. So while my 3D experience may be limited at this stage of development, I will further improve my artwork through these projects. The games Industry focuses more on level design, environment where players can interact in. While the animation industry focuses on compositing, vfx and stills. Although there will always be a heavy overlap with both area. My previous project taught me the extreme basics of the process of building an still environment in a 3D medium. I wanted to develop this further with a greater deadline. This FMP provides me the opportunity to do just that. Although over the last 2 years, I have taken the opportunity to develop my skills with the intent of this project in mind. The first ever project I did on my creative media production course was a digital painting of my bedroom window. This taught me the fundamentals of layout, perspective, colour theory and common rules while introducing me to photoshop. The projects after this made me aware of the importance of feedback, evaluation and documenting methods and developing my work as far as I can. It wasn't until the very end of year 1 that I started experimenting in 3D, first attempting to learn MAYA. Since the beginning of year 2, I have made an effort to keep exploring the medium alongside any school projects. Extra lessons taught me organic modelling using downloaded rigs, particle physics, destruction physics, texturing, further modelling in MAYA and Blender. This will be incredibly useful in my later 3D projects. With my exploration into the career of 3D environment design in “Project 2, Task 2”, I begun to form a greater understanding of the roles place in the industry. So while the idea of going into background design did not occur until the previous project, the last 2 years have equip me with the skills to achieve a competent design.
Section 2: Project Concept
The basic premise of this project is to explore the creation of environments. I want to delve into environment design with the intention of creating a single design in three different mediums. Thankfully, I have already begun to dabble in this topic prior to the yr2 FMP. During “Project 2, Task 2” I learnt the fundamentals of designing and producing a 3D background. Although I was incredibly limited to a schedule of 5 weeks to learn everything from scratch. Because of this experience, I now know the basic process of creating an environment including several skills that come in handy. This also enlightened me to the pitfalls to avoid and common issues that will need solution. My intention is that with a 3-month deadline, I can push the boundaries of my artwork much further than before. Granted there will be more issues to fix due to diving into unknown territory. Although all such problems will be solved with time. I plan to create a traditional 2D sketch, a digital painting in photoshop and a 3D version in Blender. The biggest issue that will occur is translating a background across three separate mediums. What works as a sketch many not be viable as a 3D background. On top of this, my experience in Photoshop and digital painting is extremely limited. I have a massive skill gap to fill compared to the other 2. Likewise, starting the new 3D environment with a greater timeframe will let me push the boundaries of what I accomplished before. The reason behind the creation of these 3 environment artworks is simply a fact of self-improvement. I am not creating these for a specific medium or purpose (although it would do well to explore these further), merely to improve my own artistic ability. This means delving into and breaking down other artists work, tracking down book and video sources and incorporating real life experiments. Photographs will be a big advantage, likewise with the gathering of feedback from multiple sources. I want to build of the theming of the previous pyramid designs in “project 2, task 2” with a “Desert Ravine” theme. While the 5-week project focused on achieving the illusion of distance with horizontal depth, I will attempt to do so vertically this time. Through careful research and planning, I will attempt to mimic the feeling of vertigo. This could also be assisted or even substituted with feelings of dread, terror and isolation. I will begin to create multiple sketches ranging from 5 to 10 minutes. After several different concept sketches, created using collected references, I will begin to narrow down my vision until I am left with a single A4 artwork. This will then be translated into a 3D block out, modelled and layout in Blender. Last time I used Unreal, a games engine. Although for the purpose of a render with animated elements, Blender achieves the same job. If I was to make my design a playable level, that is when Unreal will be re-considered. The models will then be improved, and the art style experimented with multiple times. Art style experimentation will delve into UV unwrapping, texturing, lighting, particles and further layout changes. . The models will still be low poly although much more detailed than the previous background. The texturing will remain simple due to my limited understanding and experience. I know from last project that this area is so huge, it wouldn't fit into my timeframe to competently learn it in time. I will instead be using lighting and shadow to compensate. Early into the production process, I need to research how to adapt my work to a targeted demographic. While I currently possess a very broad idea of my audience, I want to feel them with dread and unease. Put them on edge. To narrow down my audience for such purpose will require further research. Visual references will include film sources (Alfred Hitchcock - Vertigo), moodboards created from internet images and photographs taken by me in the real world. Other references include academic sources on film making techniques (especially perspective and camera shooting techniques), social research sources such as YouTube videos and market research into my target audience. I intend to use a combination of primary and secondary research to support my artwork. By analysing other artists within my discipline, I could incorporate their techniques into my work. Likewise, books and YouTube tutorials will achieve the same purpose. The actual size of their individual impact will have to be monitored and evaluated once used.
Section 3: Evaluation
My evaluation will be simple in execution but contain multiple parts. Each piece of documentation (research sources and experimentation) will be broken down and split into pieces by using the Gibbs reflective cycle. While some pieces may contain a brief evaluation, other more important parts will be thoroughly analysed. I will rely heavily on analysing the strengths and weaknesses of each evaluation, with many comparisons made throughout. I will give my personal feelings and experiences on each as well as discussing it's impact on the project as a collective. Parts that directly link into my artwork will be called out, while other pieces will play support into creating solutions to issues. This will finally be followed up with how I will take it further and what I would do differently next time, given the situation arises again. Although a weakness to this method of evaluation is that I can only go as far as I know up to that point. I can only break down what I can see, my level of knowledge into specific areas may not be suitable enough for additional development. I will solve this be constantly asking for feedback throughout my project. Other people will see areas that I will miss. Academic mentors have a lot more experience than myself – therefore they will spot any subtle improvement opportunities I might miss. Likewise, feedback from my target audience will help me mould the project with the intended viewers in mind. This can be carried out through surveys, interviews, and online messages. The evaluation documentation will be a combination of written evidence and as a video blog. I will document my references and inspirations to potential problem solving (practical and theoretical).
Project Action Plan and Timetable
7 weeks to create 3d piece
7 weeks photoshop
6 week traditional
2 week proposal
8 week production
2 week presentation
Proposed Research Sources and Bibliography (Harvard Format)
Highfield, C., 2022. 3D Environment Design - Pyramid and Balloons - UNFINISHED. [Online]
Available at: https://www.artstation.com/artwork/xYq6yW
[Accessed 21 February 2022].
Highfield, C., 2022. CASE STUDY: 3D ENVIORNMENTS. [Online]
Available at: https://editor.wix.com/html/editor/web/renderer/edit/ab4b605d-0b4f-4196-8887-a90ceee2653d?metaSiteId=e82fe4dc-acf6-4f0b-9eb2-be30cac6033c
[Accessed 21 February 2022].
123, T. R., 2022. TOXIC RAVEN 123 - Channel Updates and Chilling. [Online]
Available at: https://www.youtube.com/watch?v=xmKsCQCdohc
[Accessed 21 February 2022].
DoctorDoctor, 2017. Understanding Vertigo: Dizzy or Just Lightheaded?. [Online]
Available at: https://www.doctordoctor.com.au/understanding-vertigo-dizzy-just-lightheaded/
[Accessed 27 February 2022].
Vertigo. 1958. [Film] Directed by Alfred Hitchcock. United States of America: Paramount Pictures.
Wikipedia, 2022. Vertigo (film). [Online]
Available at: https://en.wikipedia.org/wiki/Vertigo_(film)#:~:text=Vertigo%20is%20a%201958%20American,Coppel%20and%20Samuel%20A.%20Taylor
[Accessed 27 February 2022].
Driscoll, P. A., 2014. “The Hitchcock Touch”: Visual Techniques in the Work of Alfred Hitchcock. [Online]
Available at: https://scholarworks.bgsu.edu/irj/vol1/iss1/4
[Accessed 27 February 2022].
Shields, M., 2021. How Does the Dolly Zoom Work?. [Online]
Available at: https://filmschoolrejects.com/dolly-zoom/
[Accessed 28 February 2022].
StudioBinder, 2019. The Dolly Zoom Effect: Cinematic Camera Movements in Film [Vertigo Effect] #dollyzoom. [Online]
Available at: https://www.youtube.com/watch?v=ttZAdY3n4nc
[Accessed 28 February 2022].
123, T. R., 2022. FMP Year 2 - Week 1 Blog. [Online]
Available at: https://www.youtube.com/watch?v=qe2SQSo-Fsw
[Accessed 26 February 2022].

BIBLIOGRAPHY - PROPOSAL
Entertainment, W., 2019. How to create a low poly branched tree in Blender 2.8. [Online]Available at: https://www.youtube.com/watch?v=V0LyhVM6ILk&list=LL&index=5&t=183s[Accessed 28 February 2022].
HIGHFIELD, C., 2022. 3D Environment Design - Pyramid and Balloons. [Online]
Available at: https://www.artstation.com/artwork/xYq6yW
[Accessed 7 March 2022].
Highfield, C., 2022. 3D Environment Design - Pyramid and Balloons - UNFINISHED. [Online]
Available at: https://www.artstation.com/artwork/xYq6yW
[Accessed 21 February 2022].
Highfield, C., 2022. CASE STUDY: 3D ENVIORNMENTS. [Online]
Available at: https://editor.wix.com/html/editor/web/renderer/edit/ab4b605d-0b4f-4196-8887-a90ceee2653d?metaSiteId=e82fe4dc-acf6-4f0b-9eb2-be30cac6033c
[Accessed 21 February 2022].
123, T. R., 2022. TOXIC RAVEN 123 - Channel Updates and Chilling. [Online]
Available at: https://www.youtube.com/watch?v=xmKsCQCdohc
[Accessed 21 February 2022].
DoctorDoctor, 2017. Understanding Vertigo: Dizzy or Just Lightheaded?. [Online]
Available at: https://www.doctordoctor.com.au/understanding-vertigo-dizzy-just-lightheaded/
[Accessed 27 February 2022].
Vertigo. 1958. [Film] Directed by Alfred Hitchcock. United States of America: Paramount Pictures.
Wikipedia, 2022. Vertigo (film). [Online]
Available at: https://en.wikipedia.org/wiki/Vertigo_(film)#:~:text=Vertigo%20is%20a%201958%20American,Coppel%20and%20Samuel%20A.%20Taylor
[Accessed 27 February 2022].
Driscoll, P. A., 2014. “The Hitchcock Touch”: Visual Techniques in the Work of Alfred Hitchcock. [Online]
Available at: https://scholarworks.bgsu.edu/irj/vol1/iss1/4
[Accessed 27 February 2022].
Shields, M., 2021. How Does the Dolly Zoom Work?. [Online]
Available at: https://filmschoolrejects.com/dolly-zoom/
[Accessed 28 February 2022].
StudioBinder, 2019. The Dolly Zoom Effect: Cinematic Camera Movements in Film [Vertigo Effect] #dollyzoom. [Online]
Available at: https://www.youtube.com/watch?v=ttZAdY3n4nc
[Accessed 28 February 2022].
123, T. R., 2022. FMP Year 2 - Week 1 Blog. [Online]
Available at: https://www.youtube.com/watch?v=qe2SQSo-Fsw
[Accessed 26 February 2022].
REFERENCE OF WHO IT IS AND TIME ACCESSED - DATE OF CREATION UNAVAILABLE
Graham F.W Collins
Accessed 2nd, March 2022
Date created n/a
Photographs - not uploaded anywhere else
Highfield, C., 2022. 3D Environment Design - Pyramid and Balloons - UNFINISHED. [Online]
Available at: https://www.artstation.com/artwork/xYq6yW
[Accessed 21 February 2022].
Highfield, C., 2022. CASE STUDY: 3D ENVIORNMENTS. [Online]
Available at: https://editor.wix.com/html/editor/web/renderer/edit/ab4b605d-0b4f-4196-8887-a90ceee2653d?metaSiteId=e82fe4dc-acf6-4f0b-9eb2-be30cac6033c
[Accessed 21 February 2022].
123, T. R., 2022. TOXIC RAVEN 123 - Channel Updates and Chilling. [Online]
Available at: https://www.youtube.com/watch?v=xmKsCQCdohc
[Accessed 21 February 2022].
DoctorDoctor, 2017. Understanding Vertigo: Dizzy or Just Lightheaded?. [Online]
Available at: https://www.doctordoctor.com.au/understanding-vertigo-dizzy-just-lightheaded/
[Accessed 27 February 2022].
Vertigo. 1958. [Film] Directed by Alfred Hitchcock. United States of America: Paramount Pictures.
Wikipedia, 2022. Vertigo (film). [Online]
Available at: https://en.wikipedia.org/wiki/Vertigo_(film)#:~:text=Vertigo%20is%20a%201958%20American,Coppel%20and%20Samuel%20A.%20Taylor
[Accessed 27 February 2022].
Driscoll, P. A., 2014. “The Hitchcock Touch”: Visual Techniques in the Work of Alfred Hitchcock. [Online]
Available at: https://scholarworks.bgsu.edu/irj/vol1/iss1/4
[Accessed 27 February 2022].
Shields, M., 2021. How Does the Dolly Zoom Work?. [Online]
Available at: https://filmschoolrejects.com/dolly-zoom/
[Accessed 28 February 2022].
StudioBinder, 2019. The Dolly Zoom Effect: Cinematic Camera Movements in Film [Vertigo Effect] #dollyzoom. [Online]
Available at: https://www.youtube.com/watch?v=ttZAdY3n4nc
[Accessed 28 February 2022].
123, T. R., 2022. FMP Year 2 - Week 1 Blog. [Online]
Available at: https://www.youtube.com/watch?v=qe2SQSo-Fsw
[Accessed 26 February 2022].