
CASE STUDY: 3D ENVIORNMENTS
Outline Breif, plan, motive, aim and possible challenges
The aim for this project is to explore and research a discipline of my choosing, within the animation industry. The goal is to obtain a greater understanding of my chosen field and create an artwork using what I've learnt. This will require creating a plan and researching into possible fields of animation. A quick experiment in each will give me some hands on experience and let me make a better informed decision. Once I have chosen my field, I will then research, create and later develop my art piece.
On top of this, I need to carry academic research on a figure prominent within my chosen field. The context behind the field must inform my creation. This will include the history of the role, it's place within the industry, how views have impacted it and finally research in academic and cultural settings. This is how I will specifically convey my understanding to the audience of this project/art piece and how I will strengthen my work. These findings will be shown in an minimum of 1000 word case study.
Planning:
The project has a deadline for February the 11th, giving up to 5 weeks from this point to complete. I want to explore an new area and incorporate what I've learnt up to this point to create my artwork. Considering my career choice will lead me into 3D animation, I want to explore a field in 3D. That's not to say I can't experiment with other mediums in the early stages. The first week of this project will consist of discovering my chosen area. I will explore and experiment in multiple areas to get first hand experience in my options. From then on I can plan my exploration.
My prior knowledge of the various mediums of animation will be my first direct primary experience that I draw upon. Using this I can account my first hand experience and infer what I learnt to choose what to explore further. Likewise, it will be effective in establishing where the holes in my knowledge currently sit. This means I can either develop what I already know or take an risk with a brand new discipline instead.
This will lead into secondary research (using the internet and various websites) to narrow down new areas until I form my answer.
PLANNING ROUGH NOTES - 11/1
Calendar Plan - possible outline of events, aims per week
Mindmaps and moodboards - visual of possible ideas
rough ideas and sketches - sketch out some environments, play with camera position, perspective
logline and premise outlining idea - generate story driven ideas, narratives
LINK BACK TO ANIMATION, HOW ANIMATION COULD BE INCORPERATED INTO THE IDEA...
Experiment of Discipline - 10/1, 12/1
Now before I can begin to delve into an discipline and start planning out the creation of my art piece, I need to decide my area. The best way to do this is to experiment with some old and new mediums. Once I decide what I want to explore further, I can then begin researching into jobs surrounding it for my case study beginning.
So during the 1st lesson back, we were introduced to vector art, specifically illustrator. It acted very much like photoshop, with the exception being it's vector, not raster. This meant that unlike photoshop, you could zoom in infinitely into your art without loosing quality.
During this period, we were introduced to the basic interface and show 2 key tools. The shape tool allowed us to insert new shapes onto our canvas. And the Shape builder tool allowed us to snap and layer shapes on top of each other to create light and shadow (as seen in the image on the right).
ROUGH NOTES
Paths acted as edges and anchors acted as vertices. The workspace set to essential classic.


We were shows and followed a process to create a plant pot. Using these new controls, I intend to experiment further to improve my understanding. I honestly had a lot of fun creating this and want to explore it further. This would be a solid area to explore as a discipline, my current verdict. During the lesson, I even chose to add some perspective. I inserted a simple rectangle and edited it to fade into an vanishing point. The plant was then duplicated to add depth using distance. This could be furthered by alternating the colours of each plant. The further back ones becoming paler as the distance increases, likewise a slight blur could be added to have the viewers eyes focus on the foreground. That's how I would take it further. Likewise A background could be created to fit the floating plants.


ARTSTATION, 2022. Callum Highfield. [Online]
Available at: https://www.artstation.com/callumhighfield
[Accessed 11 January 2022].

Now I could include an entire section for each new medium, however that would be incredibly time consuming. It is more efficient to evaluate each all at once. prior projects have become bloated from including everything possible. The previous project was a lot more streamlined due to also creating a portfolio alongside it and time constraints. I only have 5 weeks on this project so every day has to be used wisely.
These are old artwork created by me over the space of 2 years. The acrylic paintings are actually older. While acrylic painting could be explored further, I would struggle to connect it to an discipline in animation. Much of the industry is digital now so any traditional mediums would have to be further cautiously. As well as developing an artwork, I need to link it to the industry.
Traditional pen and pencil is a personal favourite of mine and is already developed every week regardless due to external classes. Perhaps the current mentioned techniques could be incorporated into character design, environment design or concept art.
On top of this, I have been much focused on exploring 3D art as an potential career route. So it would make more sense to develop an discipline of 3D. This area is also extremely new, with only 4 months experience at most.
(ARTSTATION, 2022)


Although digital 2D mediums still need to be considered. Character illustration and character design are massive avenues to explore with plenty of opportunity. So developing my photoshop skills further will greatly benefit many opportunities later down the line.
Likewise, animation itself could be explored as an discipline. I've always enjoyed 2D animation, it's just I struggle on a technical level in this area. This is a very new area for me and as such it feels extremely unfamiliar. Much more practice is needed.
Likewise I have also experimented in 3D animation. Now I personally prefer it over 2D. The field is much more technical, relying heavily on graphs and number over drawing ability. My technical mindset fits extremely well for this area.
Likewise there are so many new areas of 3D to discover. I have only just experimented with texturing, hand painting in photoshop. Animating in 3d is still extremely new and has only just developed to a competent level. Modelling can be improved greatly. Rigging is a absolute no! My prior experience in that has enlightened me on the difficulty and razor-edged balancing act it requires. One wrong move and the entire skeleton will play up.
I do also like the idea of environment design. It is an avenue I touched on for 6 weeks at the beginning of year 1. It would feel nice to attempt it now I have a year and a half more experience under my belt. I could even attempt to create it in 3D to fit into my career direction better. it would require concept art which could incorporate traditional sketches, photoshop, or illustrator. Likewise, animation could also be a factor. My background could consist of moving elements (and thanks to the 3d medium) particles and effects.
(ARTSTATION, 2022)
It would be a brand new adventure and incorporate much of what I have learnt leading up to this. It will also introduce me to an avenue of brand new areas. For a 3D fully rendered shot/design, after speaking to a teacher specialising in 3D, I was recommended producing it in Unreal engine. This is a brand new software to explore. The environment in question would have to be designed prior (hence photoshop, traditional, illustrator) and then modelled first in Maya or Blender. After that it can be imported into Unreal to begin lighting, texturing and god knows what else. This would also overlap into the vfx industry, with the introduction of particles and other effects.
The actual career of choice in that case would be an CG environment artist. This career and similar surrounding it would be where I begin my case study research.
Highfield, C., 2021. BLENDER Destruction Part 2 - 2/2 Progress. [Online]
Available at: https://www.youtube.com/watch?v=HwsSRyoNy9o
[Accessed 12 January 2022].
Highfield, C., 2021. Motion Tracking - First Attempt - 3D Blender. [Online]
Available at: https://www.youtube.com/watch?v=5qWNXybf19E
[Accessed 12 January 2022].
Highfield, C., 2021. Torrent Art Goal Kick - FOOTBALL Animation (Portfolio). [Online]
Available at: https://www.youtube.com/watch?v=pFzudjbXIk4
[Accessed 12 January 2022].
The videos above display my current experience in Maya and Blender. I have played around with animation, destruction physics and motion tracking. Now creating a fully rendered shot will require me to model the environment to begin with.
NEW PLAN - 15/1/22
Now as of writing this on the 15th of January, I will have 4 weeks out of my 5 weeks to create the project. Week 2 will consist of the concept, planning, design and sketches of the intended scene. Week 3 will consist of modelling the actual scenery and developing it as much as possible. Week 4 and 5 will consist of texturing, lighting and learning new techniques to boost my artwork. With week 6 saved for the evaluation, referencing and last minute touches. Week 1 has been spent planning out my project, choosing a discipline and looking back at old work to provide evidence of possibilities I can explore.
On the right I have a photo of my rough notes, deciding how I will plan the next few days and the weeks ahead. Although an issue here is the lack of quality in the photo. This will have to be retaken and uploaded through other methods.

Traditional Animation Further - (14/1 - 16/1)


Now for week 1, it is all about experimenting with new mediums to help establish an discipline to explore. I wanted to further my traditional animation and illustrator skills - learnt brand new this week. Since we covered it in lesson, I have the building blocks in place to carry it on at home. So I brought an lightbox and got to work. The first thing I did was take photos of the pages made Monday and collected them into a video. It had a few small issues to fix. The slingshot would vanish and the target would appear and disappear. Not to mention there was only 14 frames to work with so not very long timewise.
To combat this, I went backwards in frames and draw in the 2 missing objects. On top of this I added some animated lines to highlight the target at the beginning of the animation. Furthermore, I kept the framerate on 10fps for both - rather than the targeted 12. This would naturally slow down the clip and add a little more time to the video. With the issues solved a new video was shot. In lesson the frames were drawn but not photographed. At home I used a tri-pod to steady the camera and experimented with what surface to shoot on. Turns out a stool from my parents bedroom provided the best shot to take photographs. As you can see in the images above, I used blue tack to frame the paper to keep movement to a minimum. If the paper was shot in different locations we would get unnecessary angles occurring.
The videos below didn't even exist outside of the lesson. Both were shot and taken at home - clear evidence of independent development. Although traditional animation may not have a strong link to 3D rendered environments, it does exist. When creating my 3D render, I still need to consider how animation could be incorporated into the shot. Now traditional is always my preferred medium compared to 2D digital. And the exploration is less about the artwork itself and more about the principles and techniques of animation. The slingshot ball focuses on squash and stretch primarily - 1 of the 12 fundamental principles of animation.
It would be a brand new adventure and incorporate much of what I have learnt leading up to this. It will also introduce me to an avenue of brand new areas. For a 3D
It would be a brand new adventure and incorporate much of what I have learnt leading up to this. It will also introduce me to an avenue of brand new areas. For a 3D
2 Point Perspective Experiment Traditional - (14/1 - 16/1)

So I decided to get ahead and started a sketch of an urban street. The main goal of this piece was to experiment with 2 point perspective and see what affect this has to my environment. The image itself was taken from an internet image. So this isn't my design. My goal was to build off my prior background experience and experiment with perspective. On the left is what I did in external art lessons. Below is me furthering it at home.
Texture was another big area I explored. Most of my prior shadings are extremely smooth. And a criticism of my previous background work was how my line language and shading styles kept differentiating.
You need to stay consistent with the art style. The trees were completely redesigned from the image. The foreground objects in front are much darker than objects further away - something to consider for the render.

Likewise I found that the closer together these 2 points became to each other, the more affect it had on my line angles. For a natural scenery, it means I need to increase the distance of the points. There is also light direction to consider. For the drawing above, the light source is located in the left hand side. This means anything right facing needs to be covered in shadow. Once again, consistency is a must. If one area doesn't follow the same rules as the rest of the artwork - it will look out of place. I honestly had a lot of fun creating this piece and would be more than happy to develop my discipline further in a traditional medium. However my career choice is within the realms of 3D. So my discipline should also follow the 3D route. However, creating sketches such as this will be brilliant for the design process. I need to know what I'm modelling before I can apply it to said software. However, I would limit my designs to 10 minute pieces going forward. If I was to keep my designs to this quality - each piece would take hours.
When coming up with ideas, I need to explore multiple branches and influences. Not to mention that the piece above could still be significantly improved. The shadows could be darker. The wooden poles could be more distinct - rather than looking like dark rectangles. There are still errors in perspective, such as the steps to multiple houses. You are never truly done with an art piece. And if I let myself get carried away with improvements, it will limit the time left to experiment with other themes and styles.
Adobe Illustrator FURTHER DEVELOPMENT - (15/1)

So we were set homework to experiment and practice the 2 new tools in illustrator. During class, I went out of my way to duplicate the plant pot twice and added a rectangle for perspective. The plant pot was the only bit taught in lesson while the rest was independent. The reason why I added basic perspective was to create depth within the scene. Perspective establishes a sense of direction
Now the original perspective simply consisted of a rectangle prior. SO to make more sense in context to the scene, I attempted to design a table.
The trick was finding the correct balance of light and dark of similar colours to give the impression of light. Likewise closer colours would be darker and more vibrant, as distance would make the colour lighter/paler.
I did have a lot of fun experimenting on this. Potentially I could illustrator to provide a digital blueprint for my 3d Piece later down the line.

Likewise, my experience in this software is extremely limited. SO once I learn the software more - I may discover a new possibility. At this stage it is simply too early to tell. What I do know is that this experience deepened my understanding of 2 new tools and will allow me to springboard myself into more complex functions.
Photoshop - Hand painted Texturing - (11/1)


Now this is a new skill that could directly translate into my project. Up until this point, I have had little to no experience in the ways of texturing. My 3D background will require a fair amount of texturing in order to look finished. This experiment was conducted in photoshop, where we were tasked with creating a wooden texture.
Initially it went horribly at first, looking more like fog than wood grain. It was also frustrating at times. Although the more practice I got the more fun it became. It crept up on me. Once again, I reckon the fact that it's a brand new method may of threw me off a bit at the start. This is a repeated occurrence as you will find out later on in this website. This implies that my soft skill known as patients can be worked upon. I need to trust the process and keep persevering in order to see the results through. This is an area (texturing) that needs to be research and expanded upon further.
Work Experience - Modelling and Rig Experiment - (13/1)

I upload this into my project as it was one of my first times experiencing blender. It finished as this project was started and ran alongside the stop-motion project. It introduced me to the basics of modelling and texturing in blender. Whilst throwing me through round 2 of rigging (round 1 being the spider project). Rigging was the whole reason this work experience got delayed for me - ending up in it being unfinished for the deadline. The more I learn about rigging, the trickier it gets. 1 wrong input and the entire rig collapses. I spent weeks attempting to get it to work with drastic and ranging results.
What this taught me is that I don't enjoy rigging and it's definitely not for me. Although it is a useful skill to have if done right. A skill that not expected at level 3. It hold huge potential if I get good at it. It would also allow me to animate my own models rather than only downloaded ones.
However the more I have done it, the less I enjoy it. So at the very least, rigging is a 3D area that i will be leaving until University to develop.
Adobe Illustrator FURTHER DEVELOPMENT - (18/1)

Texture was another big area I explored. Most of my prior shadings are extremely smooth. And a criticism of my previous background work was how my line language and shading styles kept differentiating.
You need to stay consistent with the art style. The trees were completely redesigned from the image. The foreground objects in front are much darker than objects further away - something to consider for the render.
Animation Development and Compairson - (17/1)

It would be a brand new adventure and incorporate much
Highfield, C., 2021. Fire Animation Attempt 1 | Torrent Art Animation Practice | 03 | 6/7/2021. [Online]
Available at: https://www.youtube.com/watch?v=lP9bDSamma0
[Accessed 19 January 2022].
Extras, C., 2022. toonboom exper 1. [Online]
Available at: https://www.youtube.com/watch?v=ZCOQeSk11uc
[Accessed 19 January 2022].
This section was me exploring multiple software's and different ways I could animate in 2D. I carried out another traditional animation (top right), this time focused on pose to pose animating. I also conducted experiments in Adobe Animate (top left), TV Paint (bottom left) and Toon Boom Harmony (bottom right).
Toonboom was the most difficult to animate in, being brand new and having no experience prior to this experiment. The pen would not register the stroke if the canvas was too far away. I had issues navigating the timeline and was forced to scale back the animation in order to fit it within the hour timeframe. Unlike the other 3, I have no access to this software at home, so Toon Boom experiments can only be conducted within the college within this classroom due to installations.
TV Paint is only accessible on my home PC, as I alright brought it for a student discount of 50% off (still around 500-600 pounds). This would make it less accessible to other compared to the other 3. Although this is my personal favourite. The software feels much more powerful compared to Adobe Animate. Now Animate is good for the basic functions and is reliable. Although I am limited in terms of brush selection so it wouldn't be my first choice. Great for a quick practice or experimenting with a new method. I would still use TV Paint for longer artworks. That leaves traditional. I honestly love it, it's just more long winded to turn into a digital format. I have to draw each frame from scratch, so it doesn't have the same functions/tools as digital software's. I have much more freedom in the pen/pencil which I why I love it. Although it uses a LOT of paper. Not to mention each frame needs to be photographed and imported into my motion studio app to turn into a MP4 video. And if you wanted to edit the frames/add in or take away frames then you would have to repeat the creation process all over again. Unlike the other 3 only need a new export.
Now my project is creating a background design in 3D - that is my chosen artwork for my discipline. The discipline is 3D environment artist/background artist. So although animation won't directly tie into my artwork, I still need to consider how it would influence my decisions. For example in creating a 3D background, I wouldn't then attempt to draw traditional over the 3D frames. The would require me to print out all my frames in my 3D scene. If it was just a still, so a concept piece, then it could be an option. However any movement in my background would require a video file. Digital animation would let me import this video into my animation package - allowing me to animate in 2D over the top. Likewise, software's like Blender are built to combine 3D and 2D together.
I will continue to experiment in 2D animation, in my independent time and inside class. The greater my understanding of animation, the better informed I will be in the purpose of my background creation. If I was to do this experiment again, I would also attempt a 2D and 3D merge within blender for a few seconds. That way I could obtain first hand experience in combining the two mediums together. As of right now, I have separate experience in both and both will influence my design choices.
Blender - 3D Beginning - (18/1)


Now as a class, we were introduced to Blender. Although, because I have been attending extra lessons, I already had a basic understanding. So while most struggled with this due to how new it was, I was taught prior. However that don't mean there was nothing new to learn. During this lesson, I learnt to smoothen and upscale my low poly models (sub-divisions). I learnt that placing more edge loops will sharpen objects when smoothed over. And finally we had a quick introduction into UV editing. We began the process of unwrapping our meshes to begin texturing. Now texturing is a brand new area that I not only know little about, but I will also use it heavily in my background render.
This lesson is a spring board that jumps directly into my project. I had a lot of fun creating this and it let me remove some of my rustiness when it comes to modelling.
Blender lesson notes - ROUGH
To smoothen – object mode - Right click – shade smooth
Modifier properties – subdivision surface – makes it higher res
Place edge loops will make it sharper
Uv editing - 3 for face mode -ctrl a
WEEK 2
3D Background
CONCEPT DESIGN - (19/1)
There isn't anything I would change if I was to repeat the experience. It allowed me to refresh my basic understanding of modelling. I successfully created a new modelled and followed the instructions. I also learnt new modelling tools that can directly help me in my project. What I need to do is to develop this further. I need to translate these new tools into my props/assets in my scenery. I also need to explore texturing further and discover a accurate method to impliment into my design process. Overall this was a extremely useful for a variety of reasons and it highlights where I can explore independently to further my project.


The aim of week 1 was to establish my discipline. Until i knew what I am developing, I can't officially plan a to do list of the coming weeks. Once I chose my area, I created a rough plan at the start of this page for the next 4 weeks. This is week 2 of 5 - the concept stage. The aim of this week is to design and create a blueprint for my scenery. It will begin as a sketch in a traditional medium (more most comfortable format) and result in the foundations of a 3D scene.
So I know I am creating a scenery, but what is my theme? What is the scenery about, what emotions am I conveying?
So I ran through some ideas of my theme and narrowed it down to 3 main routes. Avenue 1 consisted of an old style traditional Japanese Architecture. This takes influence of the same era of Japan as my year 1 FMP. It focuses on the lifestyle and structure rather than the legends and fokelore is all. The 2nd avenue is off a British seaside, inspired by my past experience of English coasts. Locations such as the Isle of White and the White Cliffs of Dover would be my main sources.
This would allow for plenty of primary research visiting places of inspiration for my project. This would not be an option with the lost era of Japanese culture. And finally I had the idea of an religious inspiration, from the age of Egyptian pharaohs. Religion, culture and local settings. 3 different sources of ideas. However there already exist many forms of Egyptian landscapes. So to stand out from the stereotype of pyramids, blue skies and lots of brown/yellow sand - I set my scene at night. Setting it at night would introduce a lot of blues and purples to contrast with the oranges and yellows. I could use colour theory to my advantage and catch the viewers eye with complimentary colours (opposites).
Once again, there is still a large proportion of Egyptian pyramid desert scenes set at night. So I added in Hot Air Balloons! The balloons have been an idea for weeks now. I discovered a massive event in Turkey for hot air balloons in my research - they fit surprisingly well in a different setting.
QUESTION – WHICH ONE IS YOUR FAVOURITE AND WHY
David: Like all 3 concepts. Favourite – Egypt in the night. More shown in day – contrasting colours
Emily – Egypt - Hot air balloons like – INTERESTING TO SEE
So I created 3 moodboards to show a visual representation of my vision. Once these were made, I asked 4 students in class which one is their favourite and why - after explaining what I was going to create for my project and plan. The Egyptian was a hit. Although there will be a clear sample bias with only 4 participants. Every one said about the desert being their favourite. The change in colours was a pull. Although the overall main response was the fact they haven't seen something like this before. It was the uniqueness to the normal that draw in their attention. Although it would of been done before, it is niche enough detract from the classic image everyone knows.
The sheets below feedback on the project as a collective. The responses were written by the participants below. Overall they liked the idea and felt it was a good plan. It suited my chosen field. A repetitive word of ambition was used frequently. So although they loved the concept and pitch, they realised how big of an order I was promising. In order to meet my own ambition, I will have to work hard and make use of my time as efficiently as possible.

Rough Design Traditional Experiments - (19/1)


Now that I have established an overall theme and created a visual representation of my idea - it is time to create a draft. This sketch will be the foundation of composition and perspective used in my 3D scene. So it is important to experiment with the basic layout at this early stage.
In the end I created 6 different background designs based off the mood board. I was told by my external art tutor to keep all 6 in a consistent style. Thus I would avoid the issues in my portfolio with inconsistent lines and shading. I wanted to begin by giving each theme a focus point to draw the eye. for example no 1 was the great lake - with 2 pyramids to lead the eye into the centre.


Each scene focused on changing the perspective (1 or 2pt), the context (outdoors or indoors), the camera angle (landscape, close, aerial...) as well as props and assets. Once the 6 were complete I chose 3 to further and develop. I made each one slightly bigger to allow for more details and created sharper form to the loose sketchiness of prior. On top of this I did some basic experiments with the styles of the pyramids - considering they were one of 2 massive centrepieces of 2/3. I also considered how I was going to direct the eye to a chosen point - using the rule of thirds more in my design.


Finally I evaluated all 3 on the day, seen in writing. This was how I picked which one to bring into a digital medium. I was tasked with explaining which one I was going to pick and why.
Now scene 1B (labelled on paper) was dropped for a simple reason - water. I am already attempt so many new things in order to complete this project. I have never used Unreal engine until this project. I have never created my own texture outside basic Maya functions. I have only touched partials once in blender. And on top of all this, I would have to model all new props and assets.
Now 2B was dropped for completely different reasons. The aerial camera angle made it visually the most appealing to me. Likewise it was unique to the other 5 scene due to the ruins taking centre stage. Although, due to the angle, there is no sky. I feared that without such a striking contrast of colours (due to lack of sky), the browns and yellows of the desert would merge into one. This is partially solved with the inclusion of the hot air balloons. Likewise there is big potential to animate humans in the basket because of how close to the camera it is. The ruins themselves would of been a nightmare to model as well. If this was created in a 2D medium (traditional or digital), then I would pick this one hands down.
3B seemed to be the best compromise of the other 2 to me. It still held a similar perspective to 2B, although no where near as steep. It consisted of the rocky landscape of 2B and the pyramids of 1B. Hot air balloons can be used to break up the empty space, with the sky still playing an important role in my scene. It felt like the right balance of everything currently discussed.
Overall, I enjoyed this stage of the design process. It challenged my creative abilities not in skill, but in pursuit of creating something new.
If I was to do this again, I want to create even more scenes with more new ideas. I could also create various mood boards narrowing into my theme further, creating a greater diversity of ideas around my theme. The sketches could be greater in quantity to force myself to refine my idea further. The final chosen landscape image could likely be developed further still - possibly as a complete A4 with full shading and use of lighting. To improve this, I will likely create a further development using digital software. I could re-create this scene in photoshop or illustrator to infer my use of colour/texture. This would be amazingly helpful as a direct reference to my texturing in 3D.
My Character Feedback - (11/1)

Texture was another big area I explored. Most of my prior shadings are extremely smooth. And a criticism of my previous background work was how my line language and shading styles kept differentiating.
You need to stay consistent with the art style. The trees were completely redesigned from the image. The foreground objects in front are much darker than objects further away - something to consider for the render.
The text above was a final piece to the analysis above of my traditional works. Now it's time to explain the screenshot of my feedback above. Feedback has not be seen that often during my project so far - which is an issue. feedback provides some of the greatest individual influence and breakdown of completed work. This class task explored not my work but me as a character. Soft skills and my overall image are extremely important to excelling within the industry. This task highlights if how I see myself and how others see me are one and the same. I could then compare this list to what employers are looking for in further research. The results above showed that most participants (that have known me for a year and a half) agreed with the values I brought forward.
Some even elaborated in more detail over my points, others simply agreed. My confidants and ambition were repeated points highlighted by my participants. Some even believed I was selling my 3D skills short - impressed by my prior work.
Although the piece that catches my eye is the "very opinionated" quote. The point of this task was to express my ideas and views on myself to see if it aligned with other peoples perception of me. This means my personal view will be heavily impacted by my personal outlook - it is nearly impossible to carry out this task without being opinionated. If they mean on a broader sense, it could be referring to how I express my views as a collective. I am a blunt person by nature and am still learning the art of subtlety. What this does is highlight a weakness for me to improve and work upon. Depending on the context, sometimes is may be better to let the other person believe they won - as not every fight is worth the battle.
Although once again, I may be reading too much into this. Although subtlety, patients and reading a situation are valuable skills to build. This could help me with future employment and will definitely have a positive impact on my overall character. So I will take the advice in stride and use it to better myself for the future.
Case Study Research Beginning - JOBS - (19/1,22/1)
Now the role of an "environment artist" could fall under many small disciplines in on itself. For example. When researching into jobs at glassdoor, the term '3D environment artist' gave back job results in multiple areas of the industry. From concept artist, CGI artist and 3D generalists, this area uses skills applied to several areas of the industry. Many 'environment artists' will be scattered amongst multiple jobs within their area.
For example, I found a job listing looking for an environment artist within the games industry. The job requires you to have a years experience in a triple A title so it is not an entry level position. With it you are working with other professionals to create props assets. The specifics skills to create such an environment also vary greatly. In the post below, they need to be able to texture and model as well as have experience in multiple 3D software's.
What I am slowly learning from this that this discipline has even more niches within itself. So although I want to focus on creating a background for my project art, it may also be beneficial to focus on a specific area of this.
REFERENCE FOR ABOVE PARPAGRAPHS AND IMAGES BELOW + RIGHT OF THIS TEXT:
interactive, b., 2022. Senior Environment Artist. [Online]
Available at: https://www.glassdoor.co.uk/job-listing/senior-environment-artist-bulkhead-interactive-JV_IC2662625_KO0,25_KE26,46.htm?jl=1007512080110
[Accessed 20 January 2022].
glassdoor, 2022. 3d environment artist. [Online]
Available at: https://www.glassdoor.co.uk/Job/3d-environment-artist-jobs-SRCH_KO0,21.htm
[Accessed 20 January 2022].


Now I found 2 more jobs in varied levels of experience. One of the first results to pop up in glass door was a 3D generalist role. That means that environment artist job opportunities may be more limited compared to other niches.
The below image is an advertisement from Xbox Studio Rare. This is for an artist with many years experience, a step up from the prior job looking for a years experience. Not only is the 3D artist role require the creation of props and assets, you are also responsible for the preserving the designs of the concepts. I noticed that many of the jobs have a heavy emphasis on years within the industry and a range of soft skills. Communication and time-management/tight deadlines are a recurring topic.


glassdoor, 2022. Dynamo. [Online]
Available at: https://www.glassdoor.co.uk/Overview/Working-at-Dynamo-EI_IE1148935.11,17.htm
[Accessed 20 january 2022].
Eleven, D., 2022. Enviornment Artist (UK). [Online]
Available at: https://uk.indeed.com/jobs?q=Environment+Artist&vjk=14a55b5ba5859aad
[Accessed 20 January 2022].
Finally, I looked at a 3D generalist role - as mentioned before. Although this role has no mention of previous experience in employment. This must be an entry level position., So it seems that you start the job ladder as a generalist or a "little bit of everything" person and specialise as you gain more knowledge. This little window into how to get a job afterwards will help me narrow down my discipline. It gives me a brief insight into what employers are looking for in a 3D environment artist. These skills I can develop and directly incorporate into my artwork. My 3D environment will require me to model and texture props and asset, as well as learn a brand new software. Experience in a game engine such as unreal or unity seems to go hand in hand with these positions. Not to mention a competent knowledge in Maya and Blender.
Overall I feel nervous going into this. This is the beginning of my job research and it clearly highlights how much I have to learn. I know I'm not ready at my current stage but with the right guidance, dedication and experience, I will get there. This can easily be applied to my artwork - improving upon the desired skills and methods listed in the applications. In an overarching way (beyond the project), the soft skills can be worked upon throughout my career and experience as an artist. There will always be another ladder, another stage of the process to progress to. But as long as I remain active and keep growing - I will be in a stronger position tomorrow than I am today.
The Method of Background creation - 22/1
Gerstmann, A., 2018. Animation Stuff: Background Design Tips and Tricks. [Online]
Available at: https://www.youtube.com/watch?v=RDvGas5KkI0
[Accessed 22 January 2022].
TIPS AND TRICKS
Now I have begun to get an idea of what companies look for in a background artist. But where does it fit in the animation pipeline? I found a video from a youtuber called 'Andrea Gerstmann'. And in this video it give me more insight within my chosen area. For example background art doesn't start getting designed until the storyboard is locked into place. You can re-use the same background for multiple scenes and some can only be used once. Because of this a list of requirements has to be made before background creation begins. So planning how many backgrounds and what goes into each background in my artwork will be a crucial part of my process. It will be a great way to plan out and organise my workflow in creation of my background design.
So it is essential that you stick to the planned out background - likely in the form of a storyboard sketch. Identifying where the movement lies will be crucial for framing the shot. Foreground, mid and background need to be identified within the scenery to preserve depth. To translate the vision set out by the storyboard (e.g. perspective, camera angle...) is key when designing the background. Although outside that you have a lot of creative freedom.
In terms of the process of creating your background. It is best to first map out the key elements from the storyboard, then draw in your idea rough after. Once the rough is finished, that's when the finetuning begins. The video says to "clear the stage". The background is a background after all, the focus should be on the character. So you want to make sure elements don't interfere with the main focus. The background is built to direct the eye rather than hog the spotlight. The eye direction is something I attempted in my sketches of the pyramid, using perspective lines to draw the viewer into a point. Clean up work - final line - zoom in for better detail. Eye for detail was highly requested on job searches. Focus on texture and depth.
When in the inking part of the process (final line art). Separate your major planes into layers. Draw underneath moving foreground elements that move - so there are no holes in the canvas. Paint behind linework to distinguish planes - shows separation greater.
This video has been my first secondary research into the methods behind background design. I intend to carry out further concept sketches on paper as I am creating my 3D scene. The research carried out here on new tricks and methods can be directly translated into my concept sketches and by extension my 3D background. I also loved watching this video and am definitely more than happy to continue this route of progression. The more I carry on exploring this discipline, the more I am considering taking it as a potential career option. This video also gave a few pointers on how I can set up my background for an animation to take place in. Creating a stage or sort and carefully considering where the characters will be framed should influence the design of my background going ahead.
TO WATCH OUT FOR IN BACKGROUND DESIGN
Tangents = when a foreground element and a background element are touching - DONT DO!!
Line can overlap but don't place next to.
Objects in the foreground and background looking like the same shape or size - when 1 is closer and 1 is far. If positive and/or negative space are the same shape and/or size.
When many lines intersect at the same point
REF
Gerstmann, A., 2018. Animation Stuff: Background Design Tips and Tricks. [Online]
Available at: https://www.youtube.com/watch?v=RDvGas5KkI0
[Accessed 22 January 2022].

This was a site that was highly recommended by my tutor to begin my research into background creation. This site delves not into 3D creation but overall concept work and design. It is where I discovered the Andrea Gerstmann video.
This website gives me a overall summary of the profession as a whole including its role in the production pipeline, how the creative process would be carried out in a professional setting and key skills essential for the job role.
Now I also noticed the role of the background designer also get combined with a job role titled 'layout artist'. Now according to CGspectrum, a layout artist is responsible for the cinematography or 'the order' of a scene. they arrange camera angles, shot frame, depth, perspective...
They are in charge of how the shot is "layed out" for the best viewing experience. Smaller studios especially combine the 2 together according to ScreenSkills.
Although what I like about ScreenSkill is the face the information is almost simplified or broken down into easily read chucks. It gives you the essentials and the overview is incredibly helpful when researching into career routes. They even suggest related roles on the side.
ScreenSkills, 2022. Background designer. [Online]
Available at: https://www.screenskills.com/job-profiles/browse/animation/pre-production/background-designer/
[Accessed 22 january 2022].
This is incredibly helpful for me going ahead. The information here will be referenced and translated into my 1000 word essay exploring my discipline. This project is as much about the essay as it is my artwork after all. The overview on the role of the job, software used, responsibilities and how to get in will make a great first paragraph after my introduction. I feel a lot more confident with my progress into this project now that the theory research has began. I do enjoy the experimentation but until now my research has been lacking. The research needs to influence and directly impact my artwork. The artwork needs to be created and critiqued in order to improve. I then need to take this information and improve it yet again - repeating the cycle many time over.
Research Continued - Environment Artist - 24/1
Now a lot of my previous research looked at jobs around and associated with the role, as well as some fundamental tips for designing backgrounds. In this section, I further my job research and find essential details on the specific role of environment artist. This is officially the niche I will explore and experience within this project.
My research brought me to a site called CGspectrum - where I discovered the role of "layout artist". It is on this same site that I found the role of "environment artist". An Environment artist is in charge of the background. All visuals and where the characters and objects interact is what fall under their responsibility. They set the tone and ambience of the scene. 3D environments are inserted in using a greenscreen in film. Likewise, the games industry makes the environment function and react to the rules set out by the game.
My research brought me to a site called CGspectrum - where I discovered the role of "layout artist".
It is on this same site that I found the role of "environment artist".
The screenskills website gave me an introduction of this, CGspectrum offered me further depth. On the right, I screenshotted useful information that relates to this area including my roles and responsibilities, software's used and necessary skills. It also provides further aspects of research needed for my case study. For example more research into the production pipeline is needed for games and animation - including it's place within it. Looking further into real world architecture would also help - e.g. pyramids. The landscape and geography of desert scenes. Advanced modelling (blender), basic texturing (substance research), game engine functionality (unreal engine). Many new software to learn and experiment in.
After looking at the requirements for such a role, I see myself within it. I believe I possess the foundational skills to succeed in this area of the industry. Although much development (hard and soft skills) will be needed to prepare myself for work in the field. This experience is invaluable to my project and marks the beginning of my study into my chosen discipline.
In terms of the software however, my experience has several holes that need to be patched. At this stage, I possess limited experience in Maya and Blender. I have never attempted Unity/Unreal or Mudbox. Likewise the software I have used could be expanded upon greatly. This research highlights how much I have to learn in order to make my 3D background a success. Unreal is definitely a software to look into further.


cgspectrum, 2022. Environment Artis. [Online]
Available at: https://www.cgspectrum.com/career-pathways/environment-artist
[Accessed 24 January 2022].
The Method of Background Creation - 20/1

Below is a screenshot of my asset list. This is the first asset list I've made for a 3D project - so many improvements can be made. It's important to plan out my work from the start. That way I know what work is going to be organised. Considering the simplicity, I may add to this list as the modelling progresses.


The sketch of my scene has already been established. However, I don't have the exact design of each prop. Distance will mean that many of the assets will be far enough away that detail isn't an issue. The props that will sell the scene are the pyramids and the close hot air balloon.
So I begun to create separate moodboards for each to narrow down my vision. This acts as my main reference when it comes to model design. The aim was to get multiple perspectives and multiple outlooks for the best 360 views. This is highly important as unlike 2D, I am not stuck to a single plane. Although due to the fact my render is a still shot, I only have to worry about the angles shown in the camera.
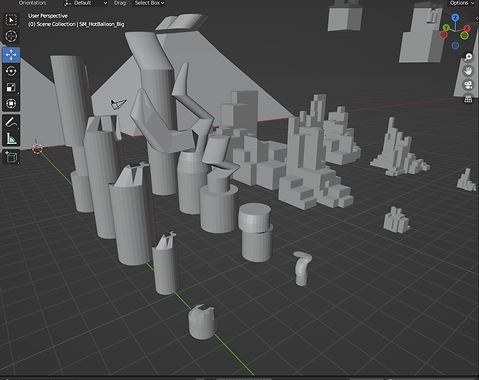
Like I created a sketch to outline my vision, I need to do the same within the 3D medium. So the next stage of the process is to create a blockout for my scene. This will let me play around with the composition and position of props and assets. It will also let me explore and translate my vision from a traditional pencil sketch to a 3D environment. This was honestly a lot of fun to create. I did underestimate the number of assets needed in my scene. Where I thought I only needed 3 rocks, the number doubled. The mountains wasn't even supposed to be modelled but landscaped. The more I progressed the more I realised how big the task I set myself was. This is a common trait I found throughout the entire project. The more work I did, the more I realised I have left to do. This project acts as a crash course through the design process of the creation of my background. The experience is invaluable in understand the work carried out within my chosen discipline. Its just a shock to the system every time and will impact/strain my time management considerably.


On the right, I have provided screenshots to the original assets. These models are low poly and extremely simple in shape. There were built to represent certain objects, stand ins, for my scene. This session had me modelling assets for the first time in blender.
Like I said above, I begun to explore new software to aid me in my project. I attempted to learn the fundamental controls of how to navigate Unreal 4 (for the first time) and how to import my models.
The Unreal experience was terrifying at first to handle. The controls felt so alien to use. The navigation of my perspective felt more like Minecraft creative mode (Java) than an professional software. I personally find the similarities fascinating between the 2.
The models were located to 0,0 in blender to help with the import. The model was then selected as an fbx file (export only). After that it was a simple drag and drop into Unreal.
From the results, I can safely say the trees were rushed. They resemble too much like the pillars. Although they are only placeholders, it may lead to confusion when telling them apart in my scene.
The rocks are my favourite out of the modelled assets. The block style gives them much more texture than the smooth surfaces of the pyramids or the mismatched cylindrical pillars. I want to potentially apply this style to the rest of my objects - keep the styling consistent.
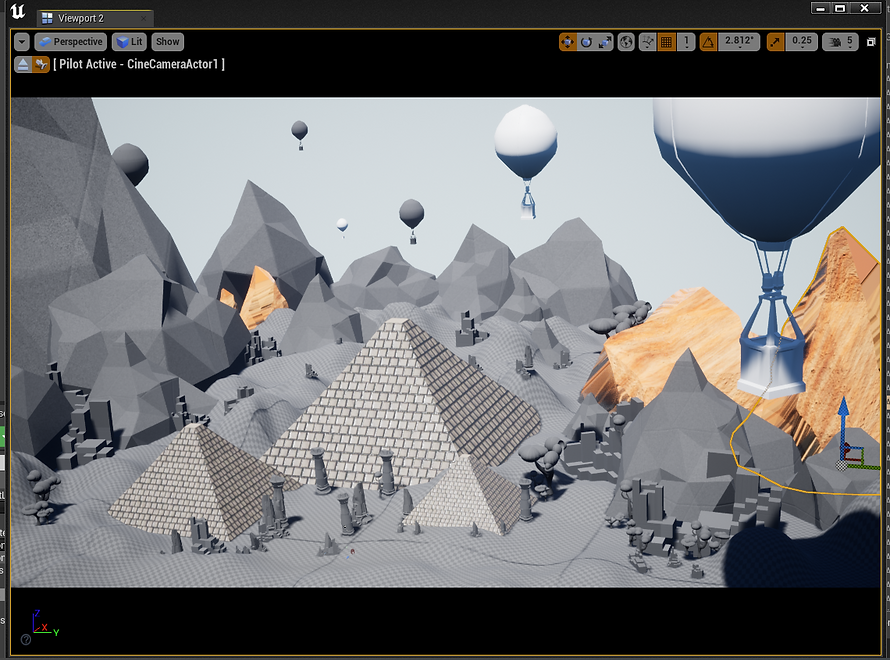
The final result of this day of creation can be seen below. It consisted of me adding in the main eye catching parts of my scenery - the pyramids and hot air balloons. I did notice that my hot air balloons position is far too linear to look natural. I did do this purposely to use perspective lines to draw the eye into the centre point. This could still work, I just have to place my assets more loosely to create a more natural aesthetic.
The sketch is a representation of my idea, the composition is definitely not final.


There is a huge number of places I can take this scene and so many more controls available to use in Unreal. I have just imported my assets into unreal and begun to create my scene. This is only the transforming location of 3rd party assets. the actual tools in unreal are still a mystery. I intend to experiment with these controls further. This will eventually feed into my fmp and provide a base understanding of the game engine to build of off.
Also, at the very top of this section, I have started creating a design process list. This is a brief summary of the creation process I have undergone in creating the background. it also means I have a foundational timeline when creating similar artworks in the same avenue. This is a guideline and will help me plan in the future/provide rough timescale estimates. The whole point of this project is to set myself up for the FMP afterall.
Blender Texturing Continued - UV MAPPING - 25/1


This is a brand new skill and method. It is also integral in the process of texturing. I need to unwrap my models in order to apply my texture effectively.
During the lesson, I created rough notes to remind me of the method as we followed along. This is my direct reference of information when carrying it out independently.
Now I will admit, this was straight forward in concept but took me a few tries to get right. Once I understood the reason behind each move, the process became much easier to preform.
I went into Blenders UV mode (Viewport Shading), applied a checkered texture as a base, applied any transformations so it was all 1 object, turned on Live Unwrap to let changes in the mesh update live and finally started adding seems. It is good to have a seem split straight down the model and the rest in rings for better management. The trick is to make the square small to restrict the texture size usage.


The screenshots above document my progress throughout. there was a lot of new tools and controls used in this session. It took a while to understand the process but the longer it went on for the more sense it made. The room itself was far too noisy but besides that I had a good time. This is going to be used directly in my project as UV unwrapping is necessary for any photoshop painted textures. If I was to do this again, I would attempt to apply it to my own block models.
Looking back at this task 2 weeks later, I was blind to the importance this had on my project. Every model in my scene needs to be textured. Every model needed to be unwrapped. The fundamental skills I learnt on this day laid the foundation for the knowledge I possess now (8/2/22). It directly impacted my work and became an integral step in the design process. It also directly impacted my asset list - the primary planning to creating my 3D background. The introduction of UV unwrapping created a brand new column to my check list further down the line, It impacted my planning, experimentation, research and overall direction of the scene. This experience was extremely important and I am excited to explore it further later down the line.
Block Modelling Continued - 27/1

Welcome to week 3 out of 5 of my project. We missed the first week due to timetable scheduling. So it means I am officially working on my tightest deadline since starting creative media production.
As always, I create rough notes during the process to remind me of the method in the future. This session I start refining my blender models, re-position and finetune my unreal scene and begin to experiment in new tools.
I also ended up creating new props labelled "mountain" to help build up the scenery. I did initially use the landscape editor to create the rocky backdrop - it was simply too smooth to my liking.
There were 3 new methods I learnt and several new tools in a nutshell. The easiest one to explain is the landscape tool and brush in Unreal 4.


Each week had around 2 days of a big push into developing my artwork, 2 days of research surrounding my case study and new processes for artwork and 2 days to upload, evaluate and document my findings.
Timing was tight to say the least.
Surprisingly, my greatest source of information came from teachers and students on other courses. To get a better understanding of my area, I begun to attend extra classes (externally arranged) geared around 3D. This provided much more insight and much more specific information than my animation course alone. By combining my time with multiple sources of experience, I was able to progress much faster than on my own. The students in these external classes provided me tips and feedback on my artwork - as well as new method to explore. The teacher also showed me new avenues of opportunity, creating a large positive impact on my project.


The students showed me an add on (after explaining my idea) called Landscape in blender. This essentially let me build the terrain and import it in like an asset.
I was able to experiment and compare this with Unreal's built in landscape editor. In the end I stuck with Unreal as I was able to mould the environment to suit the props. In blender I would of created the landscape, then the prop position to suit it - reverse.
The landscape is there to benefit the scene - while the props should be the main focus. I also made the decision to model the mountains rather than use either landscape tool. It gave me more control and I was familiar with the methods. The teacher introduced me to the collapse tool in blender to create rope. I learnt of how to sculpt to manipulate my low poly meshes. The sheer volume of new skills these lessons provided definitely fast tracked my progression. Without these lessons - I would be no where near as proficient with blender as I am today. It also taught me a brand new software in Unreal.


The screenshots above clearly show experimentation of ideas and new methods. Once I found a style I enjoyed, I could then create new assets to compliment the existing ones. After that it was a matter of layout in Unreal to create the image below.

The screenshot above shows how my scene looks from a top down view as well as the chosen angle of camera. If this was being built as a level - it would be poor. The mountains float off into the distance and the design wasn't built with players in mind. What I am attempting to say is the purpose of the art will determine and impact the direction taken to create it. I took what I learnt from the video on the tips and my concept references to create something new. The background itself has been adapted from my sketch to fit the medium of 3D. My sketch was much more complex visually compared to the initial models. Then again, the block out process was necessary to gauge the positioning of each asset.


Even if the assets are lower quality, the number of them is greatly reduced compared to the original sketch this is based upon. I personally had a lot of fun creating this. And because of this shot of experimentation - I now have my first rough vision of my background realised in 3D.
There is so many avenues to explore from here. The models themselves need improving. A style to be set and finalised. There is also the brand new route of texturing to consider. Lighting, overall atmosphere and tone, particles, animation. So many new possibilities. The idea has been established in 2 mediums with the rough layout visually created. I feel confident in the process and can't wait to see what happens next!
3D Animation - Production Pipeline - THEORY - 29/1
Our current research into my chosen discipline has taken us through the roles, skills, responsibilities and common software's of an environment artist. We have also looked at several job adverts to see what employers look for in this discipline.
This means that our understanding of the role in it's current position is frim. But what about the history of the role? and what about it's place within the greater industry?
So before we continued any further, I narrowed down where this discipline takes place in the 3D animation production pipeline. According to screenskills, they create the backgrounds after the creation of the storyboard. The idea develops into a script, the storyboard artist creates the rough vision and after that is where the background designer gets involved.
.jpeg)
CASMENCO, C., 2018. 3D Production Pipeline. [Online]
Available at: https://animeight.com/2018/02/21/3d-production-pipeline/
[Accessed 29 january 2022].
Environment artists work closely with concept artists and layout artists when designing a scene. Considering a background may even be re-used, an asset list has to be created to map out the work requirements. The scenes closely follow the storyboard design - an direct inspiration. Background design and character design usually take place alongside each other. Once both are ready, it is then the job of the layout artist to implement these 2 sections together into the scene. So in answer, the design of the background occurs towards the end of pre-production.

Preiner, R., 2008. Figure 2 - uploaded by Reinhold Preiner. [Online]
Available at: https://www.researchgate.net/figure/Game-production-pipeline-overview-Concept-content-creation-pipeline-level-design_fig2_267417785
[Accessed 29 January 2022].

Pickell, D., 2019. The 7 Stages of Game Development. [Online]
Available at: https://www.g2.com/articles/stages-of-game-development
[Accessed 29 January 2022].
The above is the pipeline for a 3D animation production. What about the games industry? This field has a lot of overlap between the 2 industries after all. And depending on which one my Environment design is based for could potentially change the entire artwork at the end of the project. The purpose of the art changes the outcome heavily.
Now it seems the modelling, texturing, lighting... side of the environment design would fall under production. The initial design (in the industry based off the storyboards) would be the actual pre-production. In the games industry, the creation of the environment would come under 'level design'. So the area that my art falls under seems to be incorporating skills from multiple disciplines in order to create the 3d background.
Above are 2 images of similar production pipelines within the game industry. This gives me insight into overlapping industries and more potential job ideas. The 2 websites I got these images from also give me a more detailed understanding of each part of the process. Although my 3D background is a still render and therefore built for the animation industry.
Updated Asset List - 29/1

Now an asset list is an item that repeatedly gets brought up in the animation and games industry. It is essential to show my planning throughout the creation of my artwork. This list will tell me what I have currently done and what is left outstanding. Currently I have the block out stage completed and the basic composition and camera angle confirmed. Right now I need to create higher detailed models before I can move onto texturing them. The distance of the scene means that not every model needs a high scale of detail. As long as the pyramid and hot air balloon have high detail then the scene will work. I will be creating these models on the Wednesday of week 4/5 (deadline feb11th). The Thursday will then be spent refining these models as well as the introduction to texturing to begin. This will consist of a combination of downloaded and created by me textures. That would leave the final 5 days to light, add the sky box and create the atmosphere of my artwork. I will also have to evaluate and reference during this period so the deadline is once again down to the wire. On the plus side, it means i have had a go at the process and learnt many new skills in preparation of my FMP.
In a nutshell. I have used the information learnt throughout my exploration of the production pipeline to inform my artwork. I have created an improved asset list (compared to the week 3 version) after realising the importance of planning how the production will be set out. I have even followed a basic layout of the animation pipeline. I went through the idea generation process with the mood boards and primary research of feedback. I went through the pre-production stage with the initial sketches (concept art). And I have begun production with the block modelling and layout design. I intend to keep following the journey of production learnt from the production pipelines and see what other sources I can directly feed into my artwork (such as the asset list 2.0).
Environment Artist - Role History - THEORY - 30/1
This section will look at key moments in the history of the medium that has influenced the discipline of 3D environment artist. That discipline itself is further broken down into layout artist, games environment artist, games level design, 3D modelling (props and assets), texturing, lighting, UV mapping, concept artist, background artist... My artwork takes elements of several areas in order to fully create my 3D environment rendered shot. So I will be looking at the 3D medium as a collective, taking into account any events and discoveries that would affect the medium.
1.1 Critically describe a range of contextual perspectives influencing a chosen discipline in creative media production.
1.2 Apply knowledge of critical perspectives to inform own practice.
2.1 Identify a range of relevant academic and cultural sources for a personal research project.
History of 3D - PROJECT 1, TASK 1, YR 2, THEORY - 31/1


REFERENCE TO OLD WORK:
Highfield, C., 2021. Task 1 - 3D Project - Robot. [Online]
Available at: https://50543926.wixsite.com/year-2/3d-project
[Accessed 31 January 2022].
The history of 3D as a medium has initially been covered during my previous project. Above I have included the references, written study and part of the mind map I created for my old project. This current project focuses on the niche of environment design, so not an exact match. However events that occurred during the rise and progression would of affected the design throughout the years.
For example, the first ever fully computer generated 3D film was ToyStory back in 1995. The backgrounds would have to be much simpler to fit the limited space available. The medium the background is built for would completely change the style and direction of the piece.
The purpose of the background also affects design. If you are creating a background for a game (or other interactive product), everything needs to be rendered real time. A film, animation, still shot... can be rendered in advanced. This means that in many practices, backgrounds in real-time renders have to be scaled down compared to static shots rendered in advance.
If we are looking at how backgrounds have evolved over the years, it would be good to examine some examples.
Star Fox 1993, was the 2nd ever 3D game Nintendo released and the 2nd to use polygonal graphics (according to Wikipedia). This was revolutionary at the time. The backgrounds were still pixilated. Likewise if too much movement occurred there would be significant drop in response time. Background couldn't be high in storage use as it would affect the performance of the game. This was released on a 16bit console, the SNES.
Donkey Kong Country used a pre-render CG and converted into sprites. This is an example of some of the shortcuts developers used to get as much use out of their visuals as possible.

MANN, M., 2020. Reviewing The First Ever Star Fox Game. [Online]
Available at: https://malonepost.com/posts/star-fox
[Accessed 1 February 2022].

Wallpaper Abyss, n.d. Donkey Kong Country Wallpapers. [Online]
Available at: https://wall.alphacoders.com/by_sub_category.php?id=195525&name=Donkey+Kong+Country+Wallpapers
[Accessed 1 January 2022].
The N64 would start to highlight some limitations of early 3D. For example you couldn't bake light sources into these games. So developers implemented light information into the textures and had a basic texture follow the character. Silent Hill in 2001 was one of the first games to use real time shadow. As technology progressed, the games got more advanced. The PS2, GameCube and Xbox era saw higher resolution and with it more detailed backgrounds. You will find mirrors extremely rare in this time period, as mirroring texture had no proper response.
Although proper lighting was becoming more prominent around the end of this era. With games such as Halo 2. Glare maps allowed light to scatter across the model more accurately in real-time renders. The use of proper lighting was widespread in static renders. For that example I looked at the Shadow the hedgehog game (2005), specifically the opening scene.
Generalkidd, 2021. 343 Finally Fixed Halo 2's Broken Graphics On MCC. [Online]
Available at: https://www.youtube.com/watch?v=ivaWIXA3RDA
[Accessed 1 February 2022].
thezjunk, 2005. Shadow the Hedgehog Opening. [Online]
Available at: https://www.youtube.com/watch?v=Z6sH1M8C2CE
[Accessed 1 February 2022].
The usage of normal in these maps allowed textures to hold more features while maintaining low poly-counts. This meant that backgrounds in games started to become much more involved. They would evolve yet again with the next console era - with the PS3 and Xbox360.
The very way artist began to create textures changed overtime. When it came to normal maps, a lot of time was spent on creating the asset alone. Now they create high poly models and bake it into textures for low poly models in order to save space. many textures were "hand painted or stitched together in photoshop" according to a brief history of 3d texturing in video games. The high poly models baked into textures started using Z-brush highly.
Ambiant Occlusion became a thing around the 360/PS3 era. This is where a shading module is used to add realism. This is done by calculating the intensity of light reaching points on the surface. However it doesn't run at full time rendering. It is also baked into a texture and used as a low poly. Although it is close to full time.
The next generation have shown improvements in colour grading and tone mapping. Many of the previous technologies of before have been built upon. Many use PBR (physically based rendering) to attempt to render images to interact like the real world. Specifically to mimic the flow of light.
REFERENCES TO ABOVE RESEARCH:
Denham, T., 2022. Texture Maps: The Ultimate Guide For 3D Artists. [Online]
Available at: https://conceptartempire.com/texture-maps/
[Accessed 1 January 2022].
Fabrik, 2022. From vintage to modern: The future, present, and history of graphic design. [Online]
Available at: https://fabrikbrands.com/the-history-of-graphic-design/
[Accessed 1 february 2022].
Generalkidd, 2021. 343 Finally Fixed Halo 2's Broken Graphics On MCC. [Online]
Available at: https://www.youtube.com/watch?v=ivaWIXA3RDA
[Accessed 1 February 2022].
MANN, M., 2020. Reviewing The First Ever Star Fox Game. [Online]
Available at: https://malonepost.com/posts/star-fox
[Accessed 1 February 2022].
Scout, T., 2019. A Brief History of 3D Texturing in Video Games. [Online]
Available at: https://discover.therookies.co/2019/05/09/a-brief-history-of-3d-texturing-in-video-games/
[Accessed 1 February 2022].
Sonic News Network, n.d. Shadow the hedgehot (game). [Online]
Available at: https://sonic.fandom.com/wiki/Shadow_the_Hedgehog_(game)
[Accessed 1 February 2022].
thezjunk, 2005. Shadow the Hedgehog Opening. [Online]
Available at: https://www.youtube.com/watch?v=Z6sH1M8C2CE
[Accessed 1 February 2022].
Wallpaper Abyss, n.d. Donkey Kong Country Wallpapers. [Online]
Available at: https://wall.alphacoders.com/by_sub_category.php?id=195525&name=Donkey+Kong+Country+Wallpapers
[Accessed 1 January 2022].
wikipedia, 2022. Ambient occlusion. [Online]
Available at: https://ru.wikipedia.org/wiki/Ambient_occlusion
[Accessed 1 February 2022].
Wikipedia, 2022. Physically based rendering. [Online]
Available at: https://en.wikipedia.org/wiki/Physically_based_rendering#:~:text=%20Physically%20based%20rendering%20%28PBR%29%20is%20a%20computer,Many%20PBR%20pipelines%20aim%20to%20achieve%20photorealism%20.
[Accessed 1 February 2022].
Wikipedia, 2022. Star Fox (1993 video game). [Online]
Available at: https://en.wikipedia.org/wiki/Star_Fox_%281993_video_game%29
[Accessed 1 February 2022].
Wikipedia, 2022. Toy Story. [Online]
Available at: https://en.wikipedia.org/wiki/Toy_Story
[Accessed 1 february 2022].
Blender - UV Mapping + Modelling - 3/2


My experiments in UV continued during external lessons. I built upon what I learnt in class and attempted to apply the same technique to my own models. This lead to some interesting results. The pyramid was easy, perfectly symmetrical and one of the simplest models out of my set. I pictured the unpeeling of the model, taking it apart face by face until it was flat. The rock puzzled me at first dur to it's abstract/chaotic shape. When asking my teacher how to tackle this, he said to tear it to pieces. In this case, it's alright to tear it apart. Along side this, I also modelled and created 3 individual trees following a YouTube tutorial. This involved new tools such as the collapse add on, 2 new modifiers and the skin resize add on.
Substance - Texturing Part 1 - 3/2

Tree Rough Notes:
Plane – collapse for single vertices
Add skin and subdivision modifier
Extrude with cursor
Click verticie Tab – skin resize
Click edge – right click, subdivide to add more verticies skin
UV ROUGH NOTES:
Open viewport shading
Small arrow In corner – options – uvs (live unwrap) – allows changes to mesh to update in uv editing
Material properties (small red ball right side) – base colour – checkered texture
Object – apply – all transforms (finalises model and backs down to a single form)
Small arrow In corner – options – uvs (live unwrap) – allows changes to mesh to update in uv editing
Select top and bottom of mesh first - Right click – mark seem
Repeat multiple times and you will unwrap your mesh – do on 90 degree angles/sharp for better seem
Entertainment, W., 2019. How to create a low poly branched tree in Blender 2.8. [Online]
Available at: https://www.youtube.com/watch?v=V0LyhVM6ILk
[Accessed 3 February 2022].


Substance was easily the most difficult and steep learning curve I faced for the entire project. I severely underestimated how involved texturing really was. By 2 days of experimentation, I had a basic understanding of how to navigate and how the software function. However I was no where near fluent in using it. It felt like learning how to model for the first time. Given a month I would be able to use it to an efficient level for my goal. Although with just over a week left - this isn't going to work.


SUBSTANCE ROUGH NOTES:
File, new – import model – 2k
Texture settings – bake mesh maps – 2k output
Add base texture
right click layer - add black mask layer (Only for new details)
right click layer – add fill
export into texture folder
black masks add detail (white areas) – add fill layer (colour), add mask (detail)
Although just because i was struggling to use the new software doesn't mean I didn't make progress. During my experimentation in college I was able to create the basic pyramid texture as well as a version of the rock texture.

Unreal 4 - Texturing and Materials - 3/2

The effect of the pyramids against the grey and white backdrop is surprisingly effective. And I am very proud to get to this stage. From learning the process of designing, model creation and now texturing and layout - major development has been made. Although until I have more of my scene textured, it will be impossible to decide if this is the right decision.
I'm exported the texture from substance into unreal as 3 different mappings. These can then be combined in the node view. Once saved, a material is created that can be dragged onto the existing models. Although without the correct UV's, the model material will warp and bend.
UNREAL ROUGH NOTES
Make a texture folder into unreal – drag all 3 into unreal – rename T_modelname_(b, m OR n)
f2 to rename
Double click to opent
Right click – create MATERIAL
Add 3 texture samples (t left click) and match nodes with screenshot
Drag material on to model
Abstract shapes – kill it with a brick – many seems, separate to pieces
MAKE SURE TO REPLACE THE MESH IN UNREAL WITH THE UV MESH FROM BLENDER FIRST!!!
Avenir Light is a clean and stylish font favored by designers. It's easy on the eyes and a great go-to font for titles, paragraphs & more.


After the 4th week of experimentation, I was left with the image above. This is a massive improvement compared to the previous week (where only the pyramids and balloons existed). Much of the other models were brought in and filled the scenery. The block out models got further improved, UV'd and textured. Although I personally prefer this landscape without the texturing. The previous full block out held a certain charm that feels lost with this addition. The textures are attempting to mimic realism while the models they attached to are extremely simplistic. This leads to drastic changes in direction as the faces change. The effect of this can been seen in the image above. So while lots of development has been made, there is a long way to go before it is finished. Also I feel like the perspective lines that guide the eye into the centre have been lost in translation. A re-shuffle of location will be necessary too. Furthermore, I need to research and experiment in creating a sky and ground for my scene. Furthermore I need to stick to a certain style for the models to click. The pyramids and mountains just look completely different and this inconsistency breaks much of the scene. I intend to go back to the sketching phrase and play around with layout and composition. During this ill consider how to create a decisive and intentional style that works within my timeframe and experience.

Environment Traditional - 3/2


This is the 2nd stage of developing my traditional drawings and concept design. My scene is in desperate need of a shuffle, so ill create 3 new sketches to aid this. Core aspects of the scene, such as mountains framing the sky, the 3 pyramids grouped together and the foreground balloon will remain unchanged. They are the core features of the environment and taking them out will change the essence altogether.
So the plan was to create 2 variations of my scene at half an A4 size. This will be an increase from the 3 previous development sketches - my main reference previously. From that I will take the elements I like from both and combine it into a final concept sketch - full A4.
The first sketch had the camera angle much more flat to the prior designs. It was also slightly closer to the pyramids than sketch 2. While sketch 2 has a more pronounced angle - with the camera looking slightly downward at the scene below. Sketch 1 incorporated 'broken' pyramids and ovular shaped balloons. The mountain range was a lot more broken up with various sizes. Sketch 2 consisted of the sweeping range from before, each structure merging into the other. Sketch 2 became much more busy on the ground than sketch 1. There was a greater focus on trees to break up the desert floor. The last thing of note is the sky. Sketch 2 had clouds directly pointing and leading the eye into the pyramid top. Sketch 1 has more natural directional cloud moving the viewer to the right. And sketch 1 had a small cave in the cliff face to break up the mountain further - giving it a centre point for the eye.
Personally I like both these designs. Although I definitely could of spent more time on both. With 30mins each give or take, more shading could of been included to emphasise distance and lighting. Likewise the lines are incredibly sketchy. If I use3d sharper lines then it would translate over to 3D better.

Now it is time to merge these together to create a new version of my background. This version will help me better understand how to layout my work in unreal. The models will be simpler than the sketches - however that doesn't mean this isn't important. The first difference is the clear size range of the pyramids. Although the 3 formation remains untouched, the further back one is significantly bigger than those in the foreground. The broken pyramid with all its building was carried over into this scene, creates diversity between the 3. A combination of round and ovular balloons were included. And the mountains went through several changes. The flatness of sketch 2 rock was sharpened and varied. While the varying depth of sketch 1 was incorporated. The mountains were separated into 3 layers to create the illusion of distance. Further back ones were lighter - as colours get more paler with distance. Likewise, foreground elements became significantly more darker.
The right side mountains and rocks went through much change too. The cave entrance is not only the centre but also warps the rest of the rock structure. The lines lead the eye straight to the entrance and up at the hot air balloon. Even the desert got more depth. Small structure were placed to break up the space. Sizing and quantity were experimented with repeatedly during this process.
This is the closest I have got to to a definitive layout. Although this will change during the translation to Unreal. Likewise, the styling of my drawing to the models are incredibly different. My sketches are much more angular and complex. Although I can incorporate the multiple layers of mountain depth and paly with the rotation and scale. That will create individuality with the 4 base models. The hot air balloons require a complete re-model. Furthermore, I want to break up my unreal scene with more trees and foliage. Getting tree and rock references for desert scene will greatly help. Likewise a tutorial on fabric generation could also help, for the balloon itself. That is what I intend to do next. In terms of how I will improve this drawing. I would concentrate on darkening the front of the scene and lightening the back to add more depth. I could also include some extra light sources from the balloons themselves. This is supposed to be set at night after all. Although currently it looks like day dur to everything being so lit up.
1000 Word Case Study - Planning - 31/1, 1/2


This is just evidence of my planning and to do list in preparation of my 1000 word case study. It also highlights everything I need to get done during the final week of this project. My short deadline has been my biggest hurdle during this experience. However as long as I keep working and use my time carefully, I can complete this.
Asset List 3.0 + LIVESTREAMED PROGRESS
Planning - 2/4, 4/2

So with all the new improvements, my asset list is in dire need of an update. This is my plan for the next and final series of experimentation. I currently need to UV all my models, texture almost every single model and adjust the lighting, skybox and ground texture. On top of this, I need to write my 1000 word case study, reference everything and document AND write half my wix site. Although the sheer amount of hours I have put into this project - I'm unsure where I could of done more. It means that once again, everything has come down to the deadline. The last few weeks have been extremely stressful, with the final week looking like the biggest challenge of it all.
Extras, C., 2022. Testing the Waters, Hello its me again 😄 - 3D Blender Stream. [Online]
Available at: https://www.youtube.com/watch?v=a2e7e5FmBM0
[Accessed 2 February 2022].
I did experiment with another way to document my progression. And that was streaming. During prior projects I create several blogs - talking into my mic largely unedited. However, there have been extremely few examples where I have streamed my work live. This allows me to interact with more people - potentially providing greater feedback.
Likewise, it will force me to create at my best. With an audience watching my every move, truly nothing gets unfiltered. My entire thought process on display. It felt daunting but reaped a lot of rewards. This method allowed me to concentrate on work whilst recording footage for my wix documentation. This form of evidence is definitely a form I will carry over into the FMP.
1000 Word Case Study - Progress - 3/2, 4/2


PROJECT UPDATE BLOG - 8/2
Extras, C., 2022. Evaluation PART 1 - P2,TASK2 - Artwork and CaseStudy, My Last 5 Weeks. [Online]
Available at: https://www.youtube.com/watch?v=VHPk2adnoa0
[Accessed 8 February 2022].


ROUGH NOTES
Week 5 final week notes/events
Step 1 – unwrap all models
Issue 1 – balloon – complex – SOLVED BY OLD NOTES AND SMART UNWRAP
Step 2 – reimport into unreal
Issue 2 – size changes MOUNTAINS
Step 3 – texture
Substance
Brush applies texture. Adding black mask – paint over what you want to show
The above video highlights and evaluates much of my current work - along with the intended direction I will take it. At this point the 1000 word case study is complete (with 2 academic ref). The background will undergo 2 more days of development. The final 2days will be for uploading everything over the last 5 weeks and writing up everything, referencing everything and recording an evaluation of my entire project.
What ever state my background is in after the next 2 days - that it stay like tell the project ends. There is simply not enough time to do any different.
This is crunch and I forced to scale back if I going to be ready in time!

The above screenshots show my updated models and assets created in blender. I re-imported them in unreal4, this time no size changes. I further experimented in substance - finding a way to isolate pieces of my mask to certain areas of my texture. However it was still extremely volatile and looked horrible. Although after taking to a teacher about my dilemma, I was recommend a method to search up. The method I researched allowed me to texture block colour in blender and unreal 4. It would separate the shape material into pieces using face selection. Then I could create materials from scratch in Unreal t5o accumulate block colour. This lead to a cell shaded look similar to 'Zelda: Wind Waker'. This is a great compromise to include colour and create a stylised look that matches the low poly models.


UNREAL4 - ROUGH NOTES
Select camera
Colour grading – add overall colour exposure to scene
Depth of field – add blurriness
Right click – create material – hold 3 (left click)
Make sure to save – drag onto model
The smart UV wrap created for the balloons made the string far too thin according to feedback within college. So texturing with any complex maps would not work for such a small surface area. The block colour avoids this. Also it retains the charm of the scene prior to any texturing. Although the trees did initially look like Lego pieces due to their more organic shape. The colours were taken directly from internet sources - images and pictures of deserts. This will create a stronger connection between my artwork and desired scenery. I then started to input earlier design tips and tricks from a YouTube video (earlier research). This theory directly impacted my artwork as a result. The closer models consisted of a darker material, while the further away models used lighter colours. Initially these were very hit and miss in terms of tone, value, hue and saturation. Although I realised I could colour pick the originally made materials, essentially duplicating varying versions. This let me keep the colours consistent.
2 new tools were used to create the image directly above. Camera settings let me play around with RGB exposures. This let me soften the colours and create an slight red glare across my scene. Likewise, I was able to blur the background to mimic a camera lens. The fore ground being more in focus in this instance. This is especially evident when looking at the hot air balloons. As the objects with the greatest ranging distance, the effect is much more prominent.


Now it is time to act on earlier feedback. For instance the logo trees and lack of texture of the balloon. So by going into the material section of blender. I could select faces and apply new materials to break up the model. When re-imported into blender. It let me paste my unreal made materials into the selected spots. That was how I applied multiple materials to my models. The hot air balloon is a traditional red to help it stand out from the dark blue night sky. A bright colour will also emphasise the shadows more effectively with greater contrast. The model went through various changes too. The very top was re-modelled to make the top less flat, removing the 'nipple effect'. The very bottom was bevelled off to make it more accurate to the basket references. The rope was lowered to matched the new top and the sharper edges help make the light/shadow stand out greater. I am also personally fond of the sharp look with the simple colours. The colours didn't apply outside blender, so the colours got re-created in unreal.
The new desert references meant the rocks became orange, the mountains a red/brown and trees more olive green. The pyramids and pillars became extremely similar in colour, both made out of the same material. All these factors combined lead to an amazing transformation.


The addition of a skybox completely transformed the scene. When removing the main light source of the scene - we were left with only environment ambience. This accidently created a beautiful situate of the scenery. I also experimented with 2 skyboxes to see what different effects they would have. What I didn't realise was that it completely changes the tone of the scene. The 2nd shot up looks like the scene is set at early sun set - late noon. While the 1st one up looks like it's set at sundown, dusk. Both look stunning and transform the scene.
Although there seem to be an issue with scaling the skybox (ndr). It only expanded to half the background. This meant that a lot of the further away models got lost from view. This heavily restricts the distance and by extension, the depth achieved. It is a 2K skybox. So hopefully if I add a 4k version, it will scale bigger. This would partially solve the issue. My other issue is the limited amount of options available. Unless I create my own in photoshop, which there isn't enough time left, I am stuck with a 30 ndr selection.
If I was to take this further, I would attempt to create my own skybox, or edit a pre-built one in photoshop. I would also mess around with hand-painted textures like at the beginning of the project. Overall this was a lot of fun and I am proud with the result. However EVERYTHING in this scene can be improved. For example, applying the different materials to the mountain formations. Roughness and metallic to the textures. Lighting, custom skybox, atmospheric qualities and experiments. Completely re-modelling the pyramids!! They are still technically undeveloped from the block out phrase! The ground needs texturing. People could be added within the baskets. Light sources can be added to the balloons. Lanterns in the sky maybe? Further detail to the cell shading? So man avenues to explore. So although there is so much that can be done to improve this, I am proud with where I got to.
Not to mention animated elements. I could of had light particles dance across the sky, the stars in the sky twinkling. Adding camera manipulation - a major strength in working in a 3D medium. Animating people in the balloons. Animating the balloons to float up and down. Maybe a rock fall on the mountain tops. I could incorporate noise, folly, ambient sound... The room to add animation into my work is huge.
At the start of this project, I had no experience at all at creating 3D backgrounds. I learnt and created my own design process in concept arts. I created a background from scratch for the first time in a year. I modelled all the assets and props - never done to this quantity before. First time using block out process. First EVER time using Unreal4 and Adobe Substance painter! First time UV mapping, Texturing, creating materials... If I had more time to work upon this, I would go through the above paragraph and start incorporating elements one by one. I wouldn't of done this project any differently. Except for 1 thing. While the 1st official week took place before the class came back from the Christmas holidays, I should of began then. Attempting to do so much new stuff, so many new ideas, was simply too much in 5 weeks. This background got scaled down massively due to timeframe alone.
EVALUATION 11/2
Extras, C., 2022. Evaluation PART 1 - P2,TASK2 - Artwork and CaseStudy, My Last 5 Weeks. [Online]
Available at: https://www.youtube.com/watch?v=VHPk2adnoa0
[Accessed 8 February 2022].
Extras, C., 2022.Evaluation PART 2 - PROJECT 2, TASK 2 - Callum Highfield [Online]
Available at: https://www.youtube.com/watch?v=BlhI0DFROyE
[Accessed 11 February 2022].
1000 WORD
CASE STUDY 4-7/2
CASE STUDY DISCIPLINE: ENVIORNMENT ARTIST/BACKGROUND ARTIST
Environment artists are responsible for the overall visual aesthetic of the background. They design and build the background in 3D software using a broad range of skills. (cgspectrum, 2022) They usually ‘specialise in creating indoor and outdoor settings for films and video games’, according to cgspectrum. Although depending on the medium of what they are working on, directly impact the processes used to create the background. For example working in a real-time engine compared to a static render.
3D environment artists are responsible for Modelling, texturing and designing 3D backdrops. This includes the use of 3D software to design and sculpt 3d backdrops. Commonly used software include Maya, Blender, Zbrush, Unreal, Unity and Substance (cgspectrum, 2022). Once the idea has formed, a storyboard (by storyboard artists) is created to use as the main guideline in creating the scene. They then have the creative freedom to colour, texture, light and create the scene. This is approved by the director in the end (ScreenSkills, 2022). This process runs along with the character design process. (cgspectrum, 2022) The layout artist positions both parts afterward. The background artist has their work take place towards the end of pre-production and runs over into the actual production. They work closely with concept artists, storyboard artists and layout artists. (cgspectrum, 2022) Layout artists oversee the positioning of the props and assets and are in charge of the overall cinematography of the scene. From character position to camera angle, they are the eyes of the director. (Pickell, 2019) Concept artist are usually focused on the design and the creation during pre-production. In small studios, background artist may have to combine roles with other jobs (such as layout artists). Bigger companies tend to separate these jobs out into their specialisms. Due to the design influence and collaborative workflow, a background artist requires a high level of drawing skill, strong knowledge of visual language (colour, scale, perspective…) and great communication. (Preiner, 2008) Likewise, the production phase of the project will need the background artist to create 3D props and assets, texture them and create the brand new scene in 3D. This means they are usually responsible for the lighting, composition, atmosphere and overall visual direction of the backdrop. This discipline covers many niche fields simultaneously.
Due to the broad number of skills required, this particular job is not an entry level position. (glassdoor, 2022) Many people will enter this field after multiple years of experience within their chosen industry. For example, someone many enter as a 3D generalist to improve their ability in several areas at once. Then after a few years of experience in the industry, they can apply to become an 3D environment artist. (glassdoor, 2020) Many employers are looking for people with good time management to meet deadlines, following laid out guidelines while working together with other artists (interactive, 2022). Grasps of elements such as scale, world building and asset generation are highly sort after qualities (Gerstmann, 2018).
As time has passed, the techniques that environment artist use have evolved over time. While much of it is digital in modern day film making, most of the techniques used evolved from traditional skills. Matte Painting is a clear example of this. (Sawyer, 2022) This is the process of combining live action and art to create the illusion of a setting according to Concept Art Empire. (Informit, 2019) In the traditional days of matte painting, they used exposures on the film to composite live action into built scenes. A famous example of this is in Blade Runner’s ‘Hades Scene’. Now blade runner has gone through no less than 7 different versions of release Cruz D.T. (2014) From Conception to Inception: A Never-Ending Story. In: Postmodern Metanarratives. Palgrave Macmillan, London. https://doi.org/10.1057/9781137439734_9. From endings changing to voice overs, the article called ‘From Conception to Inception: A Never-Ending Story’, provides much useful information in the editing process of the film. Although a key aspect the film is famous for are it’s long-shots – especially the Hades scene from its opening. The hades set incorporated fibreoptics, transparency with lights, flames matted onto the buildings – all according to ‘VFX Artists react to Bad @ Great CGI 62 (ft ADAM SAVAGE)’ (Crew, 2022). There was little to no digital work on this scene, almost all of it was created using traditional techniques on camera. Exposures played a heavy role in this. They would expose for lights, shadow, environment, building lights… They would black out all the unnecessary elements and create several camera passes – finally overlaying them together onto the same piece of film. (Crew, 2022) Old Matte painting works through exposures. (Adobe, 2022) By blacking out the areas around the matte, light wouldn’t reach those spots essentially creating blank spots on the film. The film would be rewound and shot again, this time live action filling in where those black holes existed. This was how layering in backgrounds was achieved without digital compositing. (Crew, 2022) The video goes onto say that if the shot is 10 seconds long, 240 frames, the film would be rewound all 240 frames and exposed 25 times per frame. That equates to about a week per shot. The results this achieved in set design/background design was staggering, especially for 1982. Although to achieve such a result, the process of filming backgrounds in film was incredibly time consuming.
Now I will focus on how backgrounds have changed and developed to fit the modern age. This will also dive down into how old skills such as matte painting have transferred over as well as new opportunities due to new technology. Now with the coming of the digital age, matte painters also had to adapt. According to Informit (Informit, 2019), MATTE PAINTERS – A SECRET WORLD OF ILLUSION’, traditional tools have become obsolete. “The giant glass windows, palette and brush art form has been replaced by the computer screen, styles pen and tablet”. However, the core of the subject remains intact. Interpreting the director’s vision and build a believable scenery to create size, depth and detail. Much of the background details are now digitally composited into live action when it comes to modern film making.
Nowadays, much of the backgrounds are composited in with greenscreens. A current example of this is Avengers: Endgame. The actors would have to rely on queues from the director and imagine the environment they were in. This wouldn’t be incorporated until pot-production. Although an issue with greenscreen is that the lighting the film was shot at doesn’t necessarily match the lighting in post-production. (Insider, 2020). This is solved later with LED screens (more in next paragraph). They reflect lights on the actors and props. Green Screens also bath the actors in green light called ‘spill’. This is also solved with the LED screens.
If we explore top of the line production of the modern era, the technology of background setup becomes crazy. The Mandalorian Season 1 makes use of a new technology run in Unreal (a games engine). It creates real time rendering to project the background/set for the show to be filmed in (Insider, 2020). This is one of the first times this has been achieved within the film industry. It removes the use of greenscreen, blue screen and painted storyboards to create the background. It’s called ‘The Volume’, 75 ft diameter and 21 ft tall. It’s a massive led screening room that can project the background in a 360 view (minus floor), giving filmmakers the freedom to changing aspects on set. Lighting, shadow, positioning… Lighting for not only the background, but for the characters can be changed on the fly. (Magic, 2020) Previously, all of this would had to be done in post. Having the freedom to show this in shooting gives the actors much more context and references to play off. This has led to amazing results. Likewise, because it’s mapped onto a screen, switching between locations is incredibly easy. This would previously require actors to travel to a different filming location with several different sets built. The camera field of view can move with the 3D background, known as the frustum according to ‘Why ‘The Mandalorian’ Uses Virtual Sets Over Green Screen | Movies Insider’ (Insider, 2020). “This allows motion-tracked cameras to execute traditional cinematography techniques within the virtual set”. Artists responsible for the background have a lot more creative freedom on set. With this new technology, they can change and control their world on shooting day. “Settings like exposure, colour, animation playback and fill lighting are available to the film makers at a moments notice” by Movie Insiders video.
REFERENCES:
cgspectrum, 2022. Environment Artis. [Online]
Available at: https://www.cgspectrum.com/career-pathways/environment-artist
[Accessed 24 January 2022].
ScreenSkills, 2022. Background designer. [Online]
Available at: https://www.screenskills.com/job-profiles/browse/animation/pre-production/background-designer/
[Accessed 22 january 2022].
cgspectrum, 2022. Layout Artist. [Online]
Available at: https://www.cgspectrum.com/career-pathways/layout-artist
[Accessed 4 February 2022].
CASMENCO, C., 2018. 3D Production Pipeline. [Online]
Available at: https://animeight.com/2018/02/21/3d-production-pipeline/
[Accessed 29 january 2022].
Eleven, D., 2022. Enviornment Artist (UK). [Online]
Available at: https://uk.indeed.com/jobs?q=Environment+Artist&vjk=14a55b5ba5859aad
[Accessed 20 January 2022].
Sawyer, M., 2022. Matte Painting In Film, VFX & Animation: What It Is & How It Works. [Online]
Available at: https://conceptartempire.com/matte-painting/
[Accessed 5 February 2022].
Crew, C., 2022. VFX Artists React to Bad & Great CGi 62 (ft. ADAM SAVAGE). [Online]
Available at: https://www.youtube.com/watch?v=1W1gH8CueHk
[Accessed 6 February 2022].
Adobe, 2022. Get the correct exposure for your photos.. [Online]
Available at: https://www.adobe.com/uk/creativecloud/photography/discover/exposure-in-photography.html#:~:text=Exposure%20is%20one%20of%20the,over%20a%20period%20of%20time
[Accessed 6 February 2022].
Insider, 2020. Why 'The Mandalorian' Uses Virtual Sets Over Green Screen | Movies Insider. [Online]
Available at: https://www.youtube.com/watch?v=Ufp8weYYDE8&t=286s
[Accessed 6 February 2022].
Magic, I. L. @., 2020. The Virtual Production of The Mandalorian Season One. [Online]
Available at: https://www.youtube.com/watch?v=gUnxzVOs3rk
[Accessed 6 February 2022].
Adobe, 2022. Get the correct exposure for your photos.. [Online]
Available at: https://www.adobe.com/uk/creativecloud/photography/discover/exposure-in-photography.html#:~:text=Exposure%20is%20one%20of%20the,over%20a%20period%20of%20time
[Accessed 6 February 2022].
Crew, C., 2022. VFX Artists React to Bad & Great CGi 62 (ft. ADAM SAVAGE). [Online]
Available at: https://www.youtube.com/watch?v=1W1gH8CueHk
[Accessed 6 February 2022].
Informit, 2019. State of the Art: Matte Painters - a Secret World of Illusion. [Online]
Available at: https://search.informit.org/doi/abs/10.3316/informit.829731303065284
[Accessed 6 Feburary 2022].
Insider, 2020. Why 'The Mandalorian' Uses Virtual Sets Over Green Screen | Movies Insider. [Online]
Available at: https://www.youtube.com/watch?v=Ufp8weYYDE8&t=286s
[Accessed 6 February 2022].
Magic, I. L. @., 2020. The Virtual Production of The Mandalorian Season One. [Online]
Available at: https://www.youtube.com/watch?v=gUnxzVOs3rk
[Accessed 6 February 2022].
Sawyer, M., 2022. Matte Painting In Film, VFX & Animation: What It Is & How It Works. [Online]
Available at: https://conceptartempire.com/matte-painting/
[Accessed 5 February 2022].
ACADEMIC REFERENCES
Pickell, D., 2019. The 7 Stages of Game Development. [Online]
Available at: https://www.g2.com/articles/stages-of-game-development
[Accessed 29 January 2022].
Preiner, R., 2008. Figure 2 - uploaded by Reinhold Preiner. [Online]
Available at: https://www.researchgate.net/figure/Game-production-pipeline-overview-Concept-content-creation-pipeline-level-design_fig2_267417785
[Accessed 29 January 2022].
Cruz D.T. (2014) From Conception to Inception: A Never-Ending Story. In: Postmodern Metanarratives. Palgrave Macmillan, London. https://doi.org/10.1057/9781137439734_9
Informit, 2019. State of the Art: Matte Painters - a Secret World of Illusion. [Online]
Available at: https://search.informit.org/doi/abs/10.3316/informit.829731303065284
[Accessed 6 Feburary 2022].
UNUSED REFERENCES
Denham, T., 2022. Texture Maps: The Ultimate Guide For 3D Artists. [Online]
Available at: https://conceptartempire.com/texture-maps/
[Accessed 1 January 2022].
Fabrik, 2022. From vintage to modern: The future, present, and history of graphic design. [Online]
Available at: https://fabrikbrands.com/the-history-of-graphic-design/
[Accessed 1 february 2022].
Generalkidd, 2021. 343 Finally Fixed Halo 2's Broken Graphics On MCC. [Online]
Available at: https://www.youtube.com/watch?v=ivaWIXA3RDA
[Accessed 1 February 2022].
MANN, M., 2020. Reviewing The First Ever Star Fox Game. [Online]
Available at: https://malonepost.com/posts/star-fox
[Accessed 1 February 2022].
Scout, T., 2019. A Brief History of 3D Texturing in Video Games. [Online]
Available at: https://discover.therookies.co/2019/05/09/a-brief-history-of-3d-texturing-in-video-games/
[Accessed 1 February 2022].
Sonic News Network, n.d. Shadow the hedgehot (game). [Online]
Available at: https://sonic.fandom.com/wiki/Shadow_the_Hedgehog_(game)
[Accessed 1 February 2022].
thezjunk, 2005. Shadow the Hedgehog Opening. [Online]
Available at: https://www.youtube.com/watch?v=Z6sH1M8C2CE
[Accessed 1 February 2022].
Wallpaper Abyss, n.d. Donkey Kong Country Wallpapers. [Online]
Available at: https://wall.alphacoders.com/by_sub_category.php?id=195525&name=Donkey+Kong+Country+Wallpapers
[Accessed 1 January 2022].
wikipedia, 2022. Ambient occlusion. [Online]
Available at: https://ru.wikipedia.org/wiki/Ambient_occlusion
[Accessed 1 February 2022].
Wikipedia, 2022. Physically based rendering. [Online]
Available at: https://en.wikipedia.org/wiki/Physically_based_rendering#:~:text=%20Physically%20based%20rendering%20%28PBR%29%20is%20a%20computer,Many%20PBR%20pipelines%20aim%20to%20achieve%20photorealism%20.
[Accessed 1 February 2022].
Wikipedia, 2022. Star Fox (1993 video game). [Online]
Available at: https://en.wikipedia.org/wiki/Star_Fox_%281993_video_game%29
[Accessed 1 February 2022].
Wikipedia, 2022. Toy Story. [Online]
Available at: https://en.wikipedia.org/wiki/Toy_Story
[Accessed 1 february 2022].
BIBLIOGRAPHY - WEEK 1 TO 5 - ENTIRE PROJECT PAGE
ARTSTATION, 2022. Callum Highfield. [Online]
Available at: https://www.artstation.com/callumhighfield
[Accessed 11 January 2022].
Extras, C., 2022. toonboom exper 1. [Online]
Available at: https://www.youtube.com/watch?v=ZCOQeSk11uc
[Accessed 19 January 2022].
Highfield, C., 2021. BLENDER Destruction Part 2 - 2/2 Progress. [Online]
Available at: https://www.youtube.com/watch?v=HwsSRyoNy9o
[Accessed 12 January 2022].
Highfield, C., 2021. Fire Animation Attempt 1 | Torrent Art Animation Practice | 03 | 6/7/2021. [Online]
Available at: https://www.youtube.com/watch?v=lP9bDSamma0
[Accessed 19 January 2022].
Highfield, C., 2021. Motion Tracking - First Attempt - 3D Blender. [Online]
Available at: https://www.youtube.com/watch?v=5qWNXybf19E
[Accessed 12 January 2022].
Highfield, C., 2021. Torrent Art Goal Kick - FOOTBALL Animation (Portfolio). [Online]
Available at: https://www.youtube.com/watch?v=pFzudjbXIk4
[Accessed 12 January 2022].
Eleven, D., 2022. Enviornment Artist (UK). [Online]
Available at: https://uk.indeed.com/jobs?q=Environment+Artist&vjk=14a55b5ba5859aad
[Accessed 20 January 2022].
glassdoor, 2020. Senior Environment Artist-XBOX Studios-Rare. [Online]
Available at: https://www.glassdoor.co.uk/Job/3d-environment-artist-microsoft-jobs-SRCH_KO0,21_KE22,31.htm
[Accessed 20 January 2020].
glassdoor, 2022. 3d environment artist. [Online]
Available at: https://www.glassdoor.co.uk/Job/3d-environment-artist-jobs-SRCH_KO0,21.htm
[Accessed 20 January 2022].
interactive, b., 2022. Senior Environment Artist. [Online]
Available at: https://www.glassdoor.co.uk/job-listing/senior-environment-artist-bulkhead-interactive-JV_IC2662625_KO0,25_KE26,46.htm?jl=1007512080110
[Accessed 20 January 2022].
glassdoor, 2022. Dynamo. [Online]
Available at: https://www.glassdoor.co.uk/Overview/Working-at-Dynamo-EI_IE1148935.11,17.htm
[Accessed 20 january 2022].
Gerstmann, A., 2018. Animation Stuff: Background Design Tips and Tricks. [Online]
Available at: https://www.youtube.com/watch?v=RDvGas5KkI0
[Accessed 22 January 2022].
ScreenSkills, 2022. Background designer. [Online]
Available at: https://www.screenskills.com/job-profiles/browse/animation/pre-production/background-designer/
[Accessed 22 january 2022].
cgspectrum, 2022. Environment Artis. [Online]
Available at: https://www.cgspectrum.com/career-pathways/environment-artist
[Accessed 24 January 2022].
CASMENCO, C., 2018. 3D Production Pipeline. [Online]
Available at: https://animeight.com/2018/02/21/3d-production-pipeline/
[Accessed 29 january 2022].
cgspectrum, 2022. Environment Artis. [Online]
Available at: https://www.cgspectrum.com/career-pathways/environment-artist
[Accessed 24 January 2022].
Highfield, C., 2021. Task 1 - 3D Project - Robot. [Online]
Available at: https://50543926.wixsite.com/year-2/3d-project
[Accessed 31 January 2022].
Pickell, D., 2019. The 7 Stages of Game Development. [Online]
Available at: https://www.g2.com/articles/stages-of-game-development
[Accessed 29 January 2022].
Preiner, R., 2008. Figure 2 - uploaded by Reinhold Preiner. [Online]
Available at: https://www.researchgate.net/figure/Game-production-pipeline-overview-Concept-content-creation-pipeline-level-design_fig2_267417785
[Accessed 29 January 2022].
ScreenSkills, 2022. Background designer. [Online]
Available at: https://www.screenskills.com/job-profiles/browse/animation/pre-production/background-designer/
[Accessed 22 january 2022].
Denham, T., 2022. Texture Maps: The Ultimate Guide For 3D Artists. [Online]
Available at: https://conceptartempire.com/texture-maps/
[Accessed 1 January 2022].
Fabrik, 2022. From vintage to modern: The future, present, and history of graphic design. [Online]
Available at: https://fabrikbrands.com/the-history-of-graphic-design/
[Accessed 1 february 2022].
Generalkidd, 2021. 343 Finally Fixed Halo 2's Broken Graphics On MCC. [Online]
Available at: https://www.youtube.com/watch?v=ivaWIXA3RDA
[Accessed 1 February 2022].
MANN, M., 2020. Reviewing The First Ever Star Fox Game. [Online]
Available at: https://malonepost.com/posts/star-fox
[Accessed 1 February 2022].
Scout, T., 2019. A Brief History of 3D Texturing in Video Games. [Online]
Available at: https://discover.therookies.co/2019/05/09/a-brief-history-of-3d-texturing-in-video-games/
[Accessed 1 February 2022].
Sonic News Network, n.d. Shadow the hedgehot (game). [Online]
Available at: https://sonic.fandom.com/wiki/Shadow_the_Hedgehog_(game)
[Accessed 1 February 2022].
thezjunk, 2005. Shadow the Hedgehog Opening. [Online]
Available at: https://www.youtube.com/watch?v=Z6sH1M8C2CE
[Accessed 1 February 2022].
Wallpaper Abyss, n.d. Donkey Kong Country Wallpapers. [Online]
Available at: https://wall.alphacoders.com/by_sub_category.php?id=195525&name=Donkey+Kong+Country+Wallpapers
[Accessed 1 January 2022].
wikipedia, 2022. Ambient occlusion. [Online]
Available at: https://ru.wikipedia.org/wiki/Ambient_occlusion
[Accessed 1 February 2022].
Wikipedia, 2022. Physically based rendering. [Online]
Available at: https://en.wikipedia.org/wiki/Physically_based_rendering#:~:text=%20Physically%20based%20rendering%20%28PBR%29%20is%20a%20computer,Many%20PBR%20pipelines%20aim%20to%20achieve%20photorealism%20.
[Accessed 1 February 2022].
Wikipedia, 2022. Star Fox (1993 video game). [Online]
Available at: https://en.wikipedia.org/wiki/Star_Fox_%281993_video_game%29
[Accessed 1 February 2022].
Wikipedia, 2022. Toy Story. [Online]
Available at: https://en.wikipedia.org/wiki/Toy_Story
[Accessed 1 february 2022].
Entertainment, W., 2019. How to create a low poly branched tree in Blender 2.8. [Online]
Available at: https://www.youtube.com/watch?v=V0LyhVM6ILk
[Accessed 3 February 2022].
Entertainment, W., 2019. How to create a low poly branched tree in Blender 2.8. [Online]
Available at: https://www.youtube.com/watch?v=V0LyhVM6ILk
[Accessed 3 February 2022].
Extras, C., 2022. Evaluation PART 1 - P2,TASK2 - Artwork and CaseStudy, My Last 5 Weeks. [Online]
Available at: https://www.youtube.com/watch?v=VHPk2adnoa0
[Accessed 8 February 2022].
Extras, C., 2022. Testing the Waters, Hello its me again 😄 - 3D Blender Stream. [Online]
Available at: https://www.youtube.com/watch?v=a2e7e5FmBM0
[Accessed 2 February 2022].
Adobe, 2022. Get the correct exposure for your photos.. [Online]
Available at: https://www.adobe.com/uk/creativecloud/photography/discover/exposure-in-photography.html#:~:text=Exposure%20is%20one%20of%20the,over%20a%20period%20of%20time
[Accessed 6 February 2022].
Crew, C., 2022. VFX Artists React to Bad & Great CGi 62 (ft. ADAM SAVAGE). [Online]
Available at: https://www.youtube.com/watch?v=1W1gH8CueHk
[Accessed 6 February 2022].
Informit, 2019. State of the Art: Matte Painters - a Secret World of Illusion. [Online]
Available at: https://search.informit.org/doi/abs/10.3316/informit.829731303065284
[Accessed 6 Feburary 2022].
Insider, 2020. Why 'The Mandalorian' Uses Virtual Sets Over Green Screen | Movies Insider. [Online]
Available at: https://www.youtube.com/watch?v=Ufp8weYYDE8&t=286s
[Accessed 6 February 2022].
Magic, I. L. @., 2020. The Virtual Production of The Mandalorian Season One. [Online]
Available at: https://www.youtube.com/watch?v=gUnxzVOs3rk
[Accessed 6 February 2022].
Sawyer, M., 2022. Matte Painting In Film, VFX & Animation: What It Is & How It Works. [Online]
Available at: https://conceptartempire.com/matte-painting/
[Accessed 5 February 2022].